I last blogged in January, but I have been working on various projects to submit to the Sisters Outdoor Quilt Show. I have some quilt tops that have been pieced for a while and need to be quilted plus I wanted to submit some post cards for the annual fundraiser at the show.
For the tiny house project, I had to decide how to piece the top because there is no pattern for the final layout.
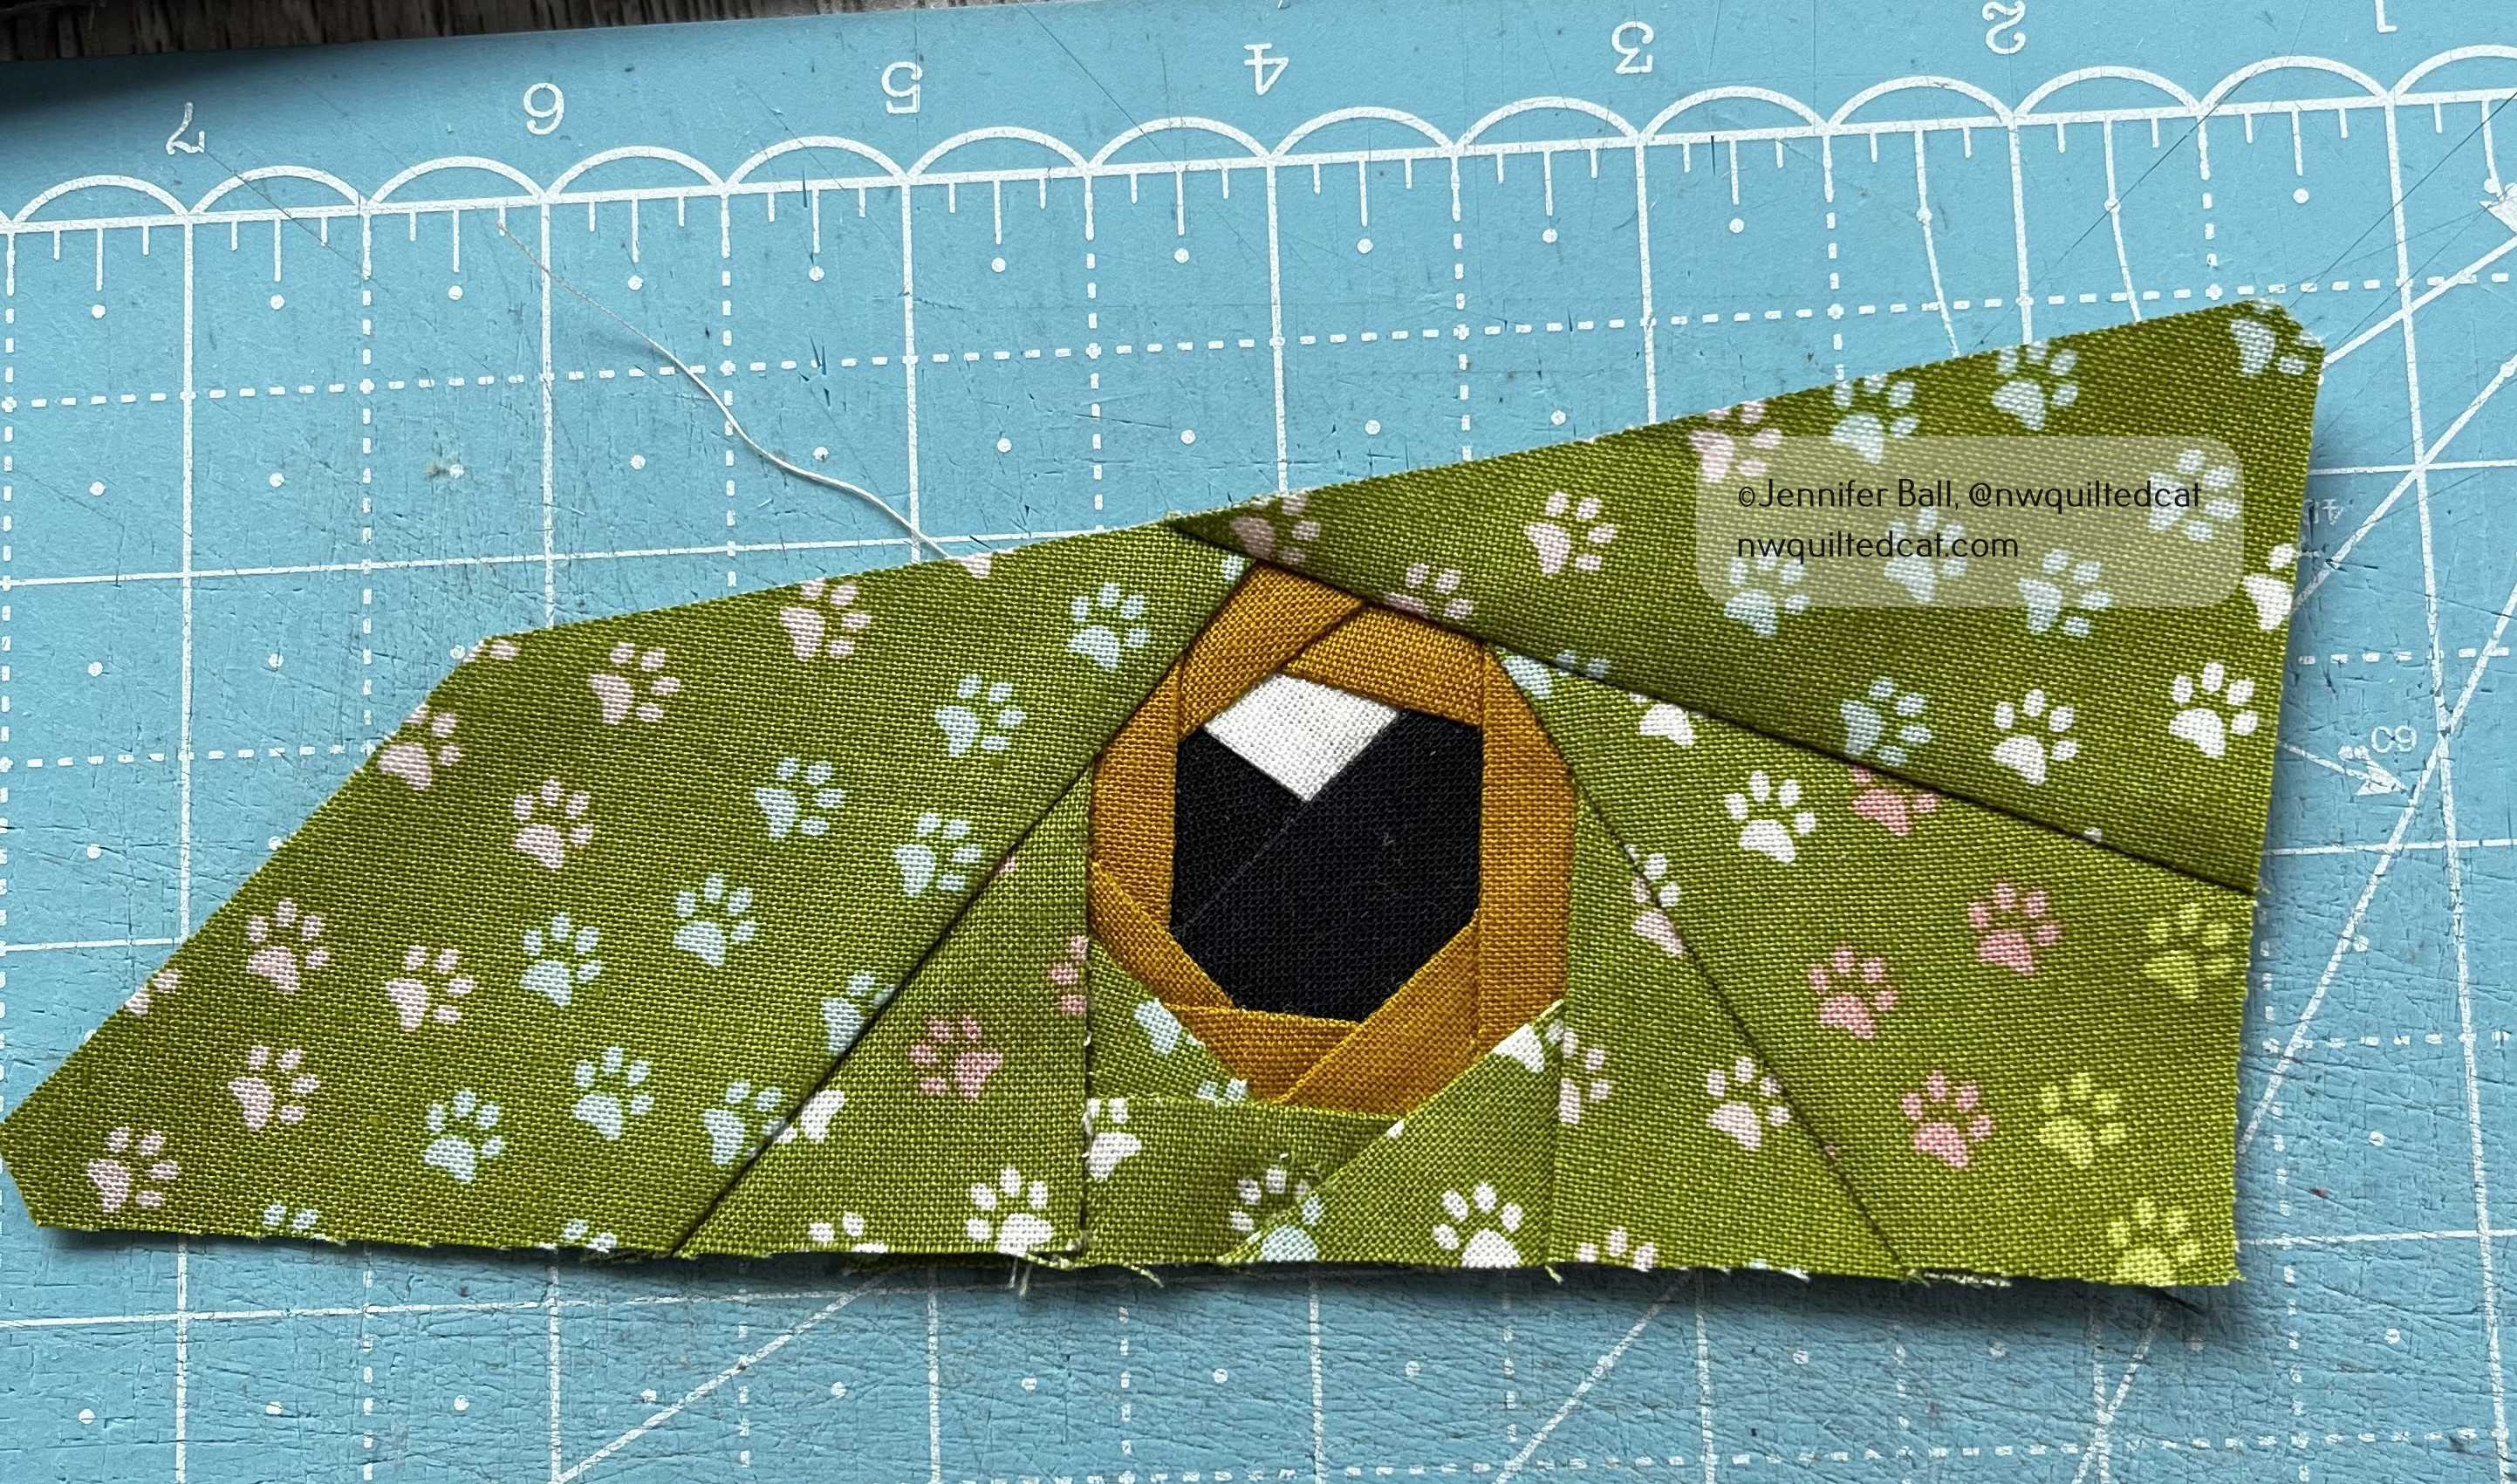
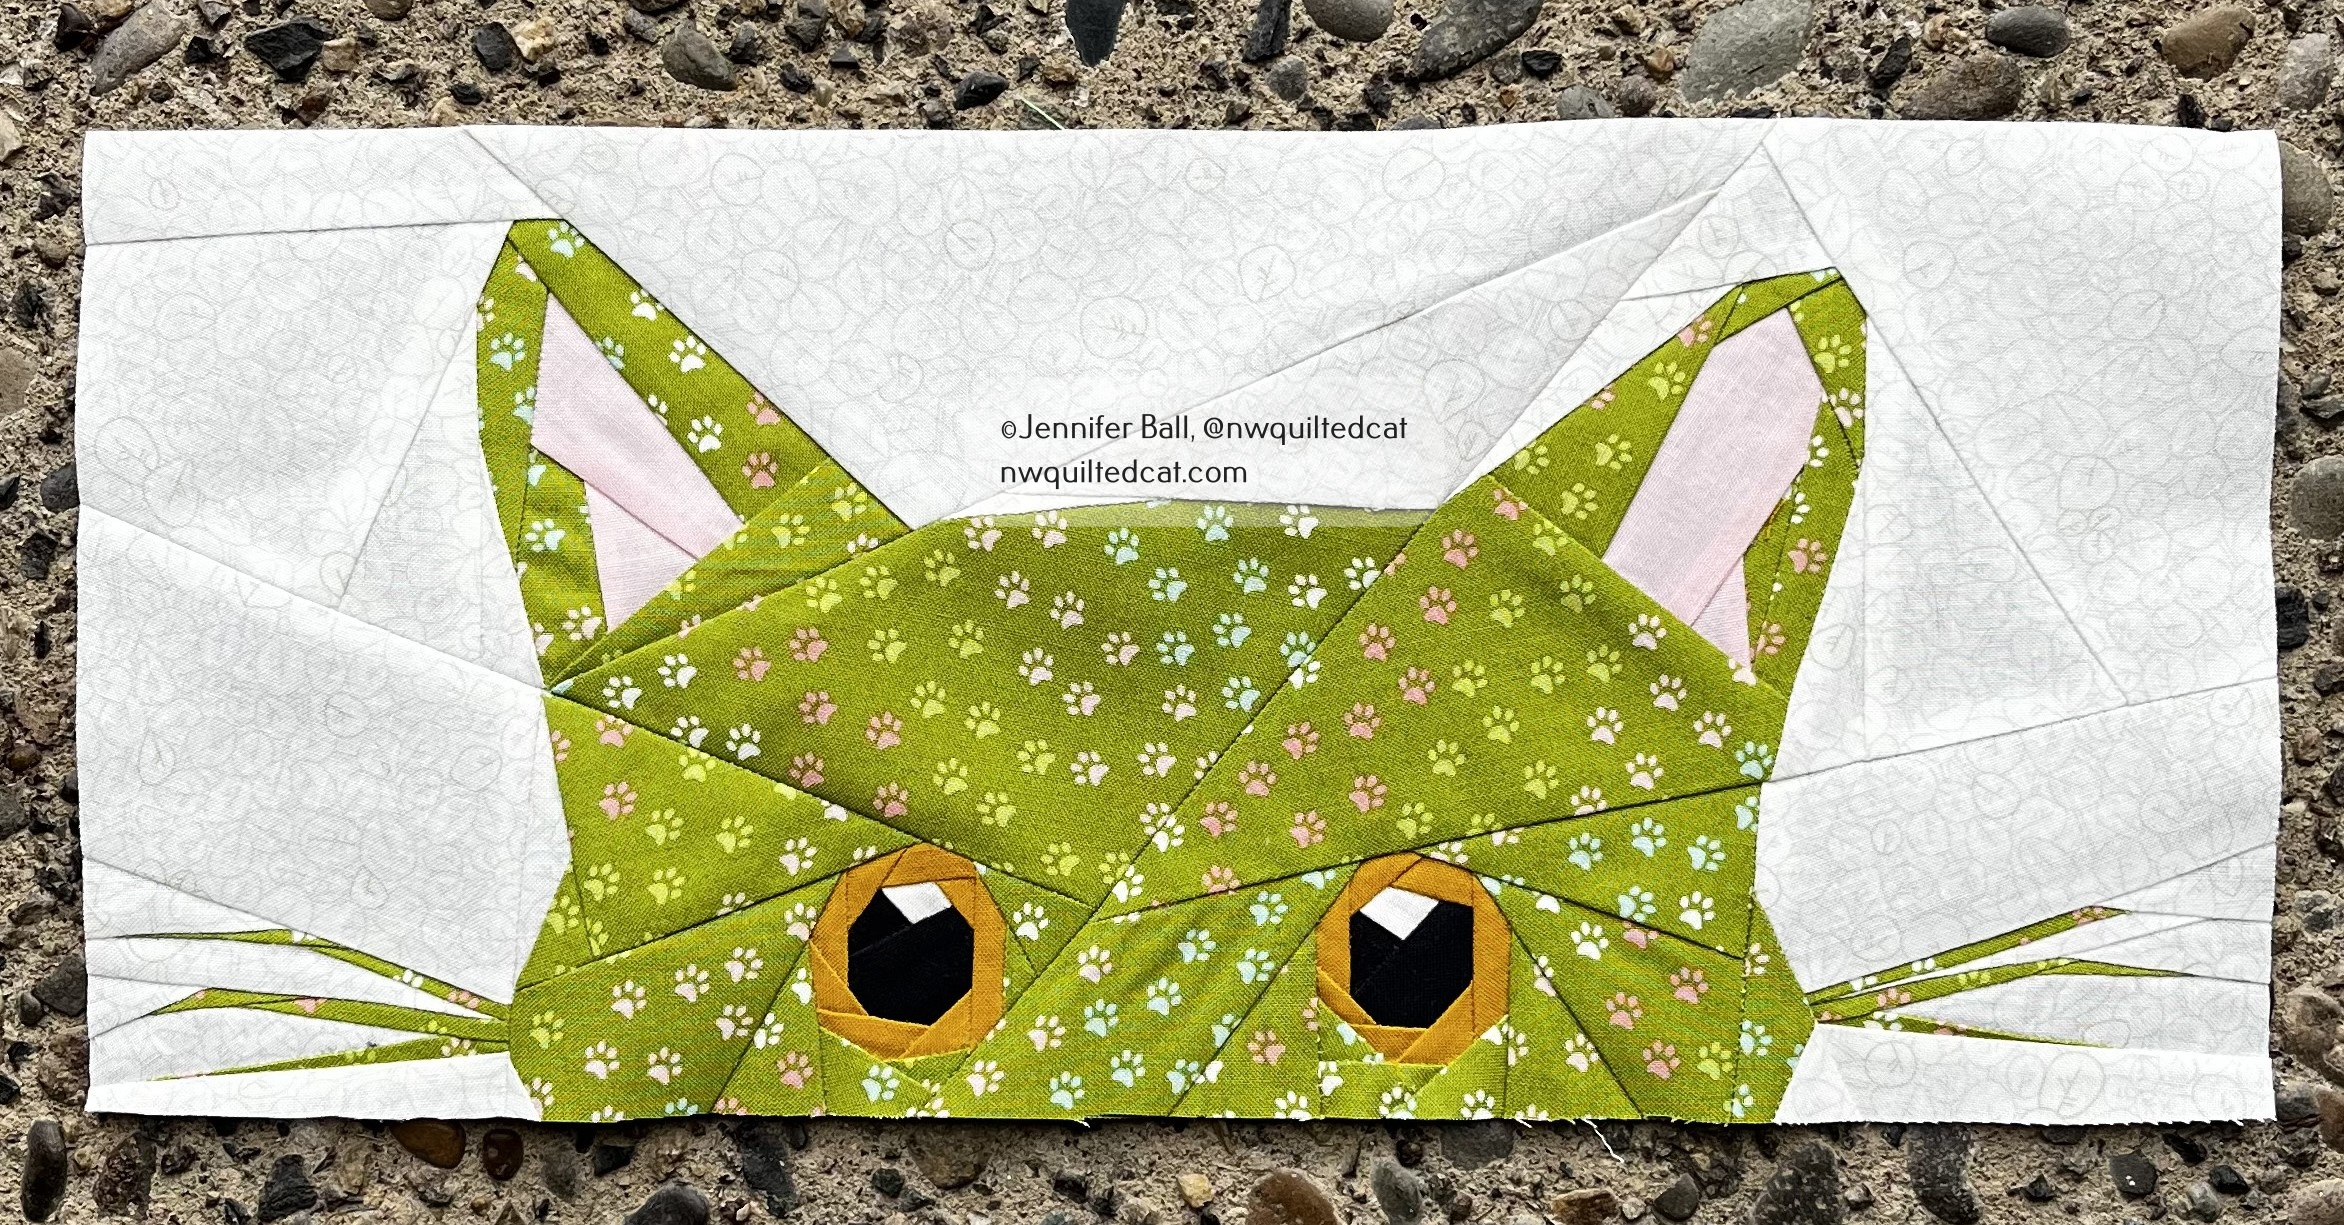
I decided that my “Meowville” quilt needed the pieced name to be on the top, but the quilt was still missing something. Hmm, what could I add? How about a giant cat face peeking out at the viewers? I found a great pattern from Quilt Art Design called “Cat Helper” that would fit my idea with a few modifications.
The cat’s eye is always watching!A partial cat head, perfect for mischievously peering down at the Meowville tiny houses
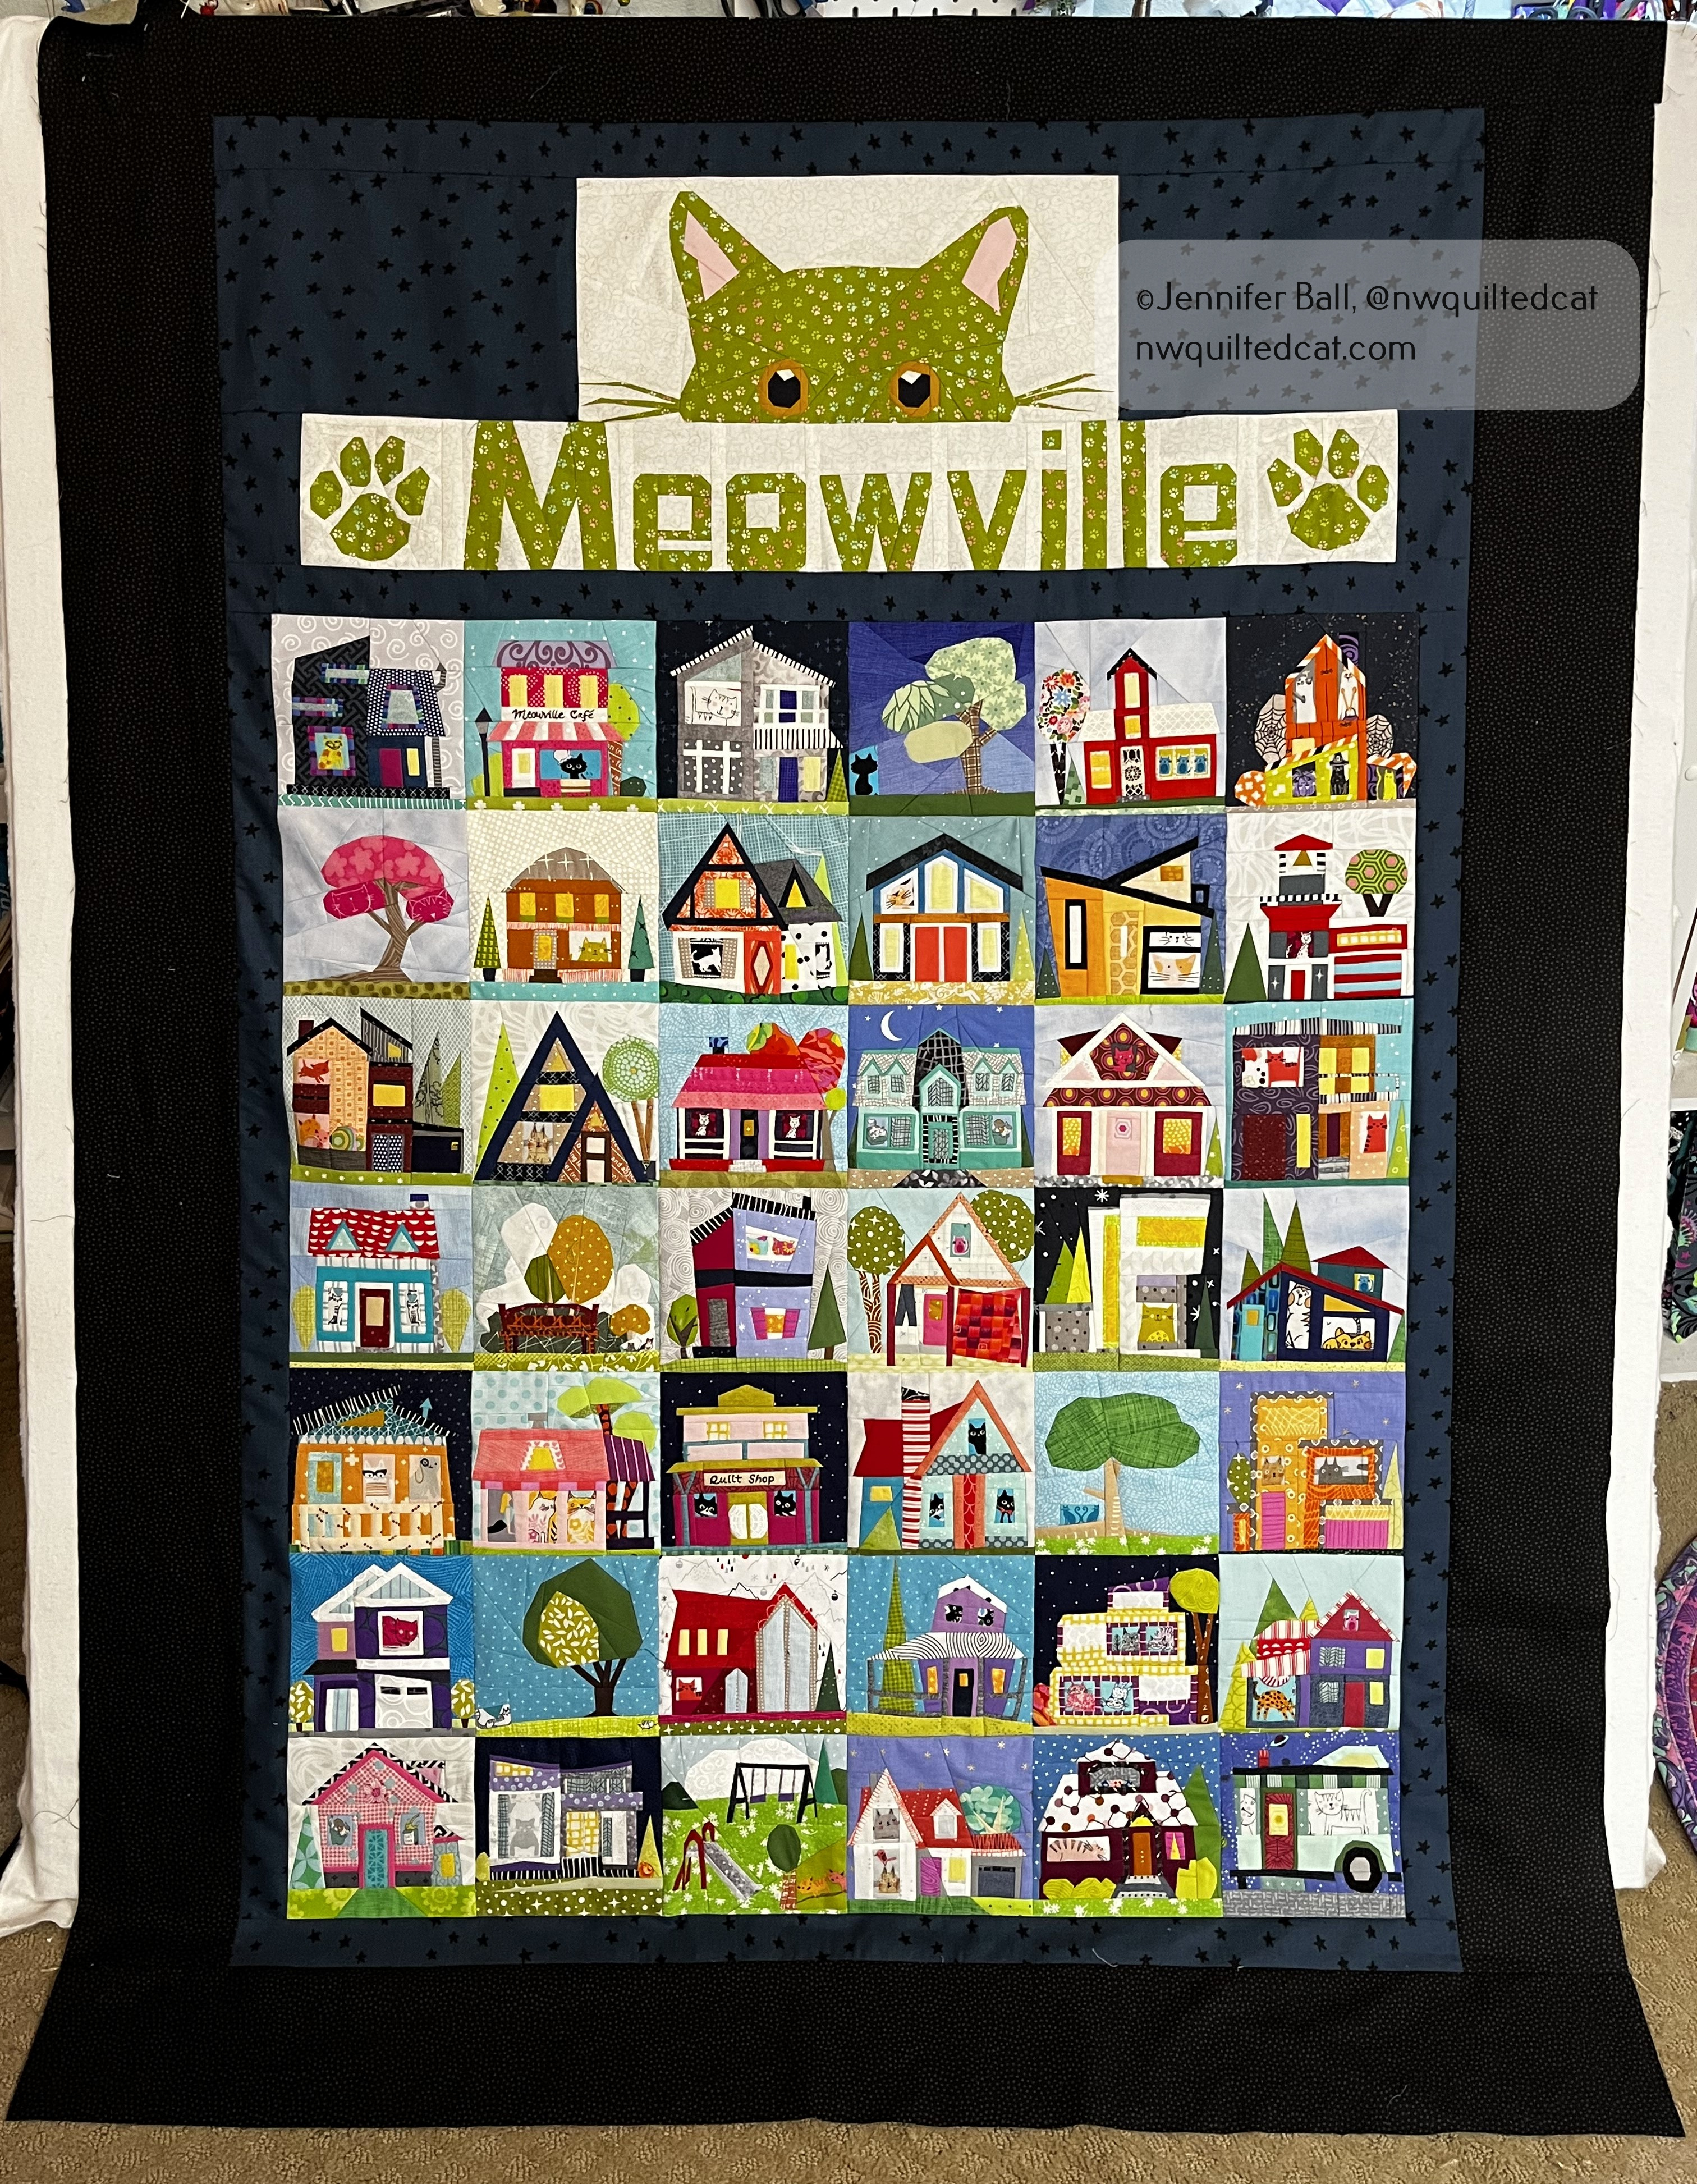
I now had the final blocks of my quilt assembled and ready to be set into a layout! I thought about a layout for a few weeks, and decided to place my tiny houses in rows without sashing strips. I set the blocks using a fun Ruby Star Society from their Starry line. I used Starry in the Smoke colorway, which is a beautiful deep blue with black stars. Finally, I added an outer border using a black print from my stash to give the quilt a nice frame and to meet the minimum width requirements for the quilt show.
Meowville quilt flimsy
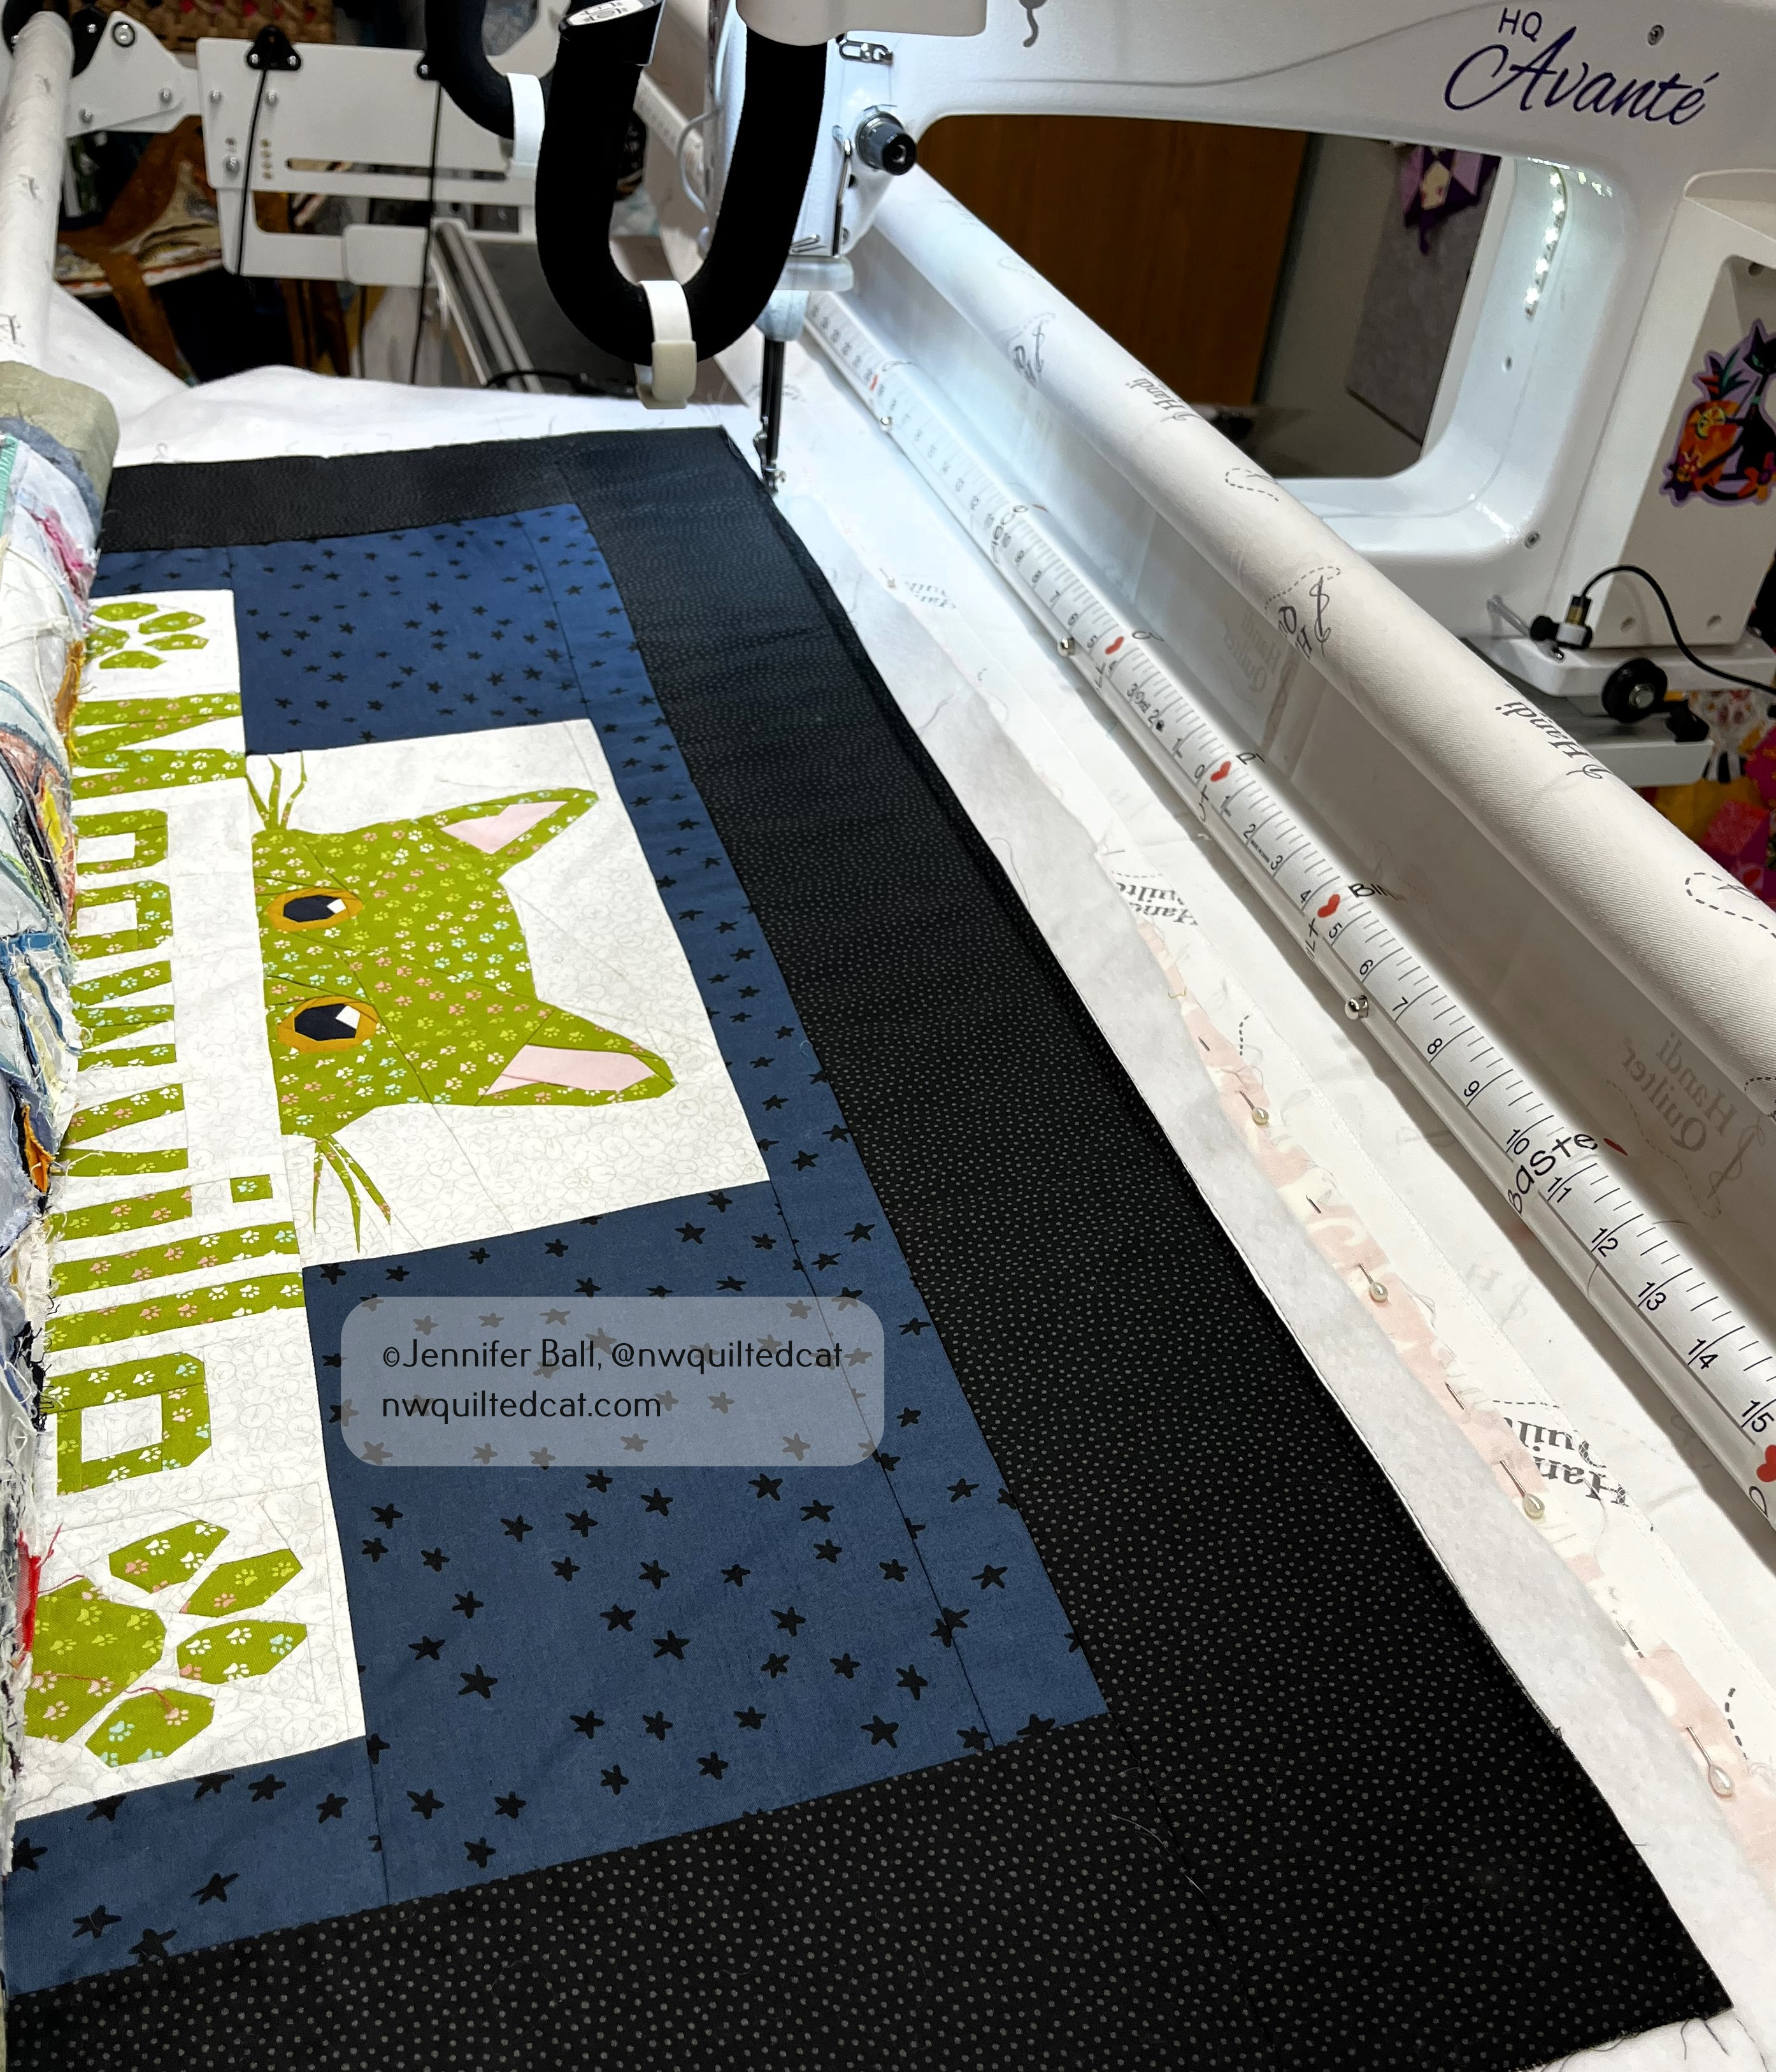
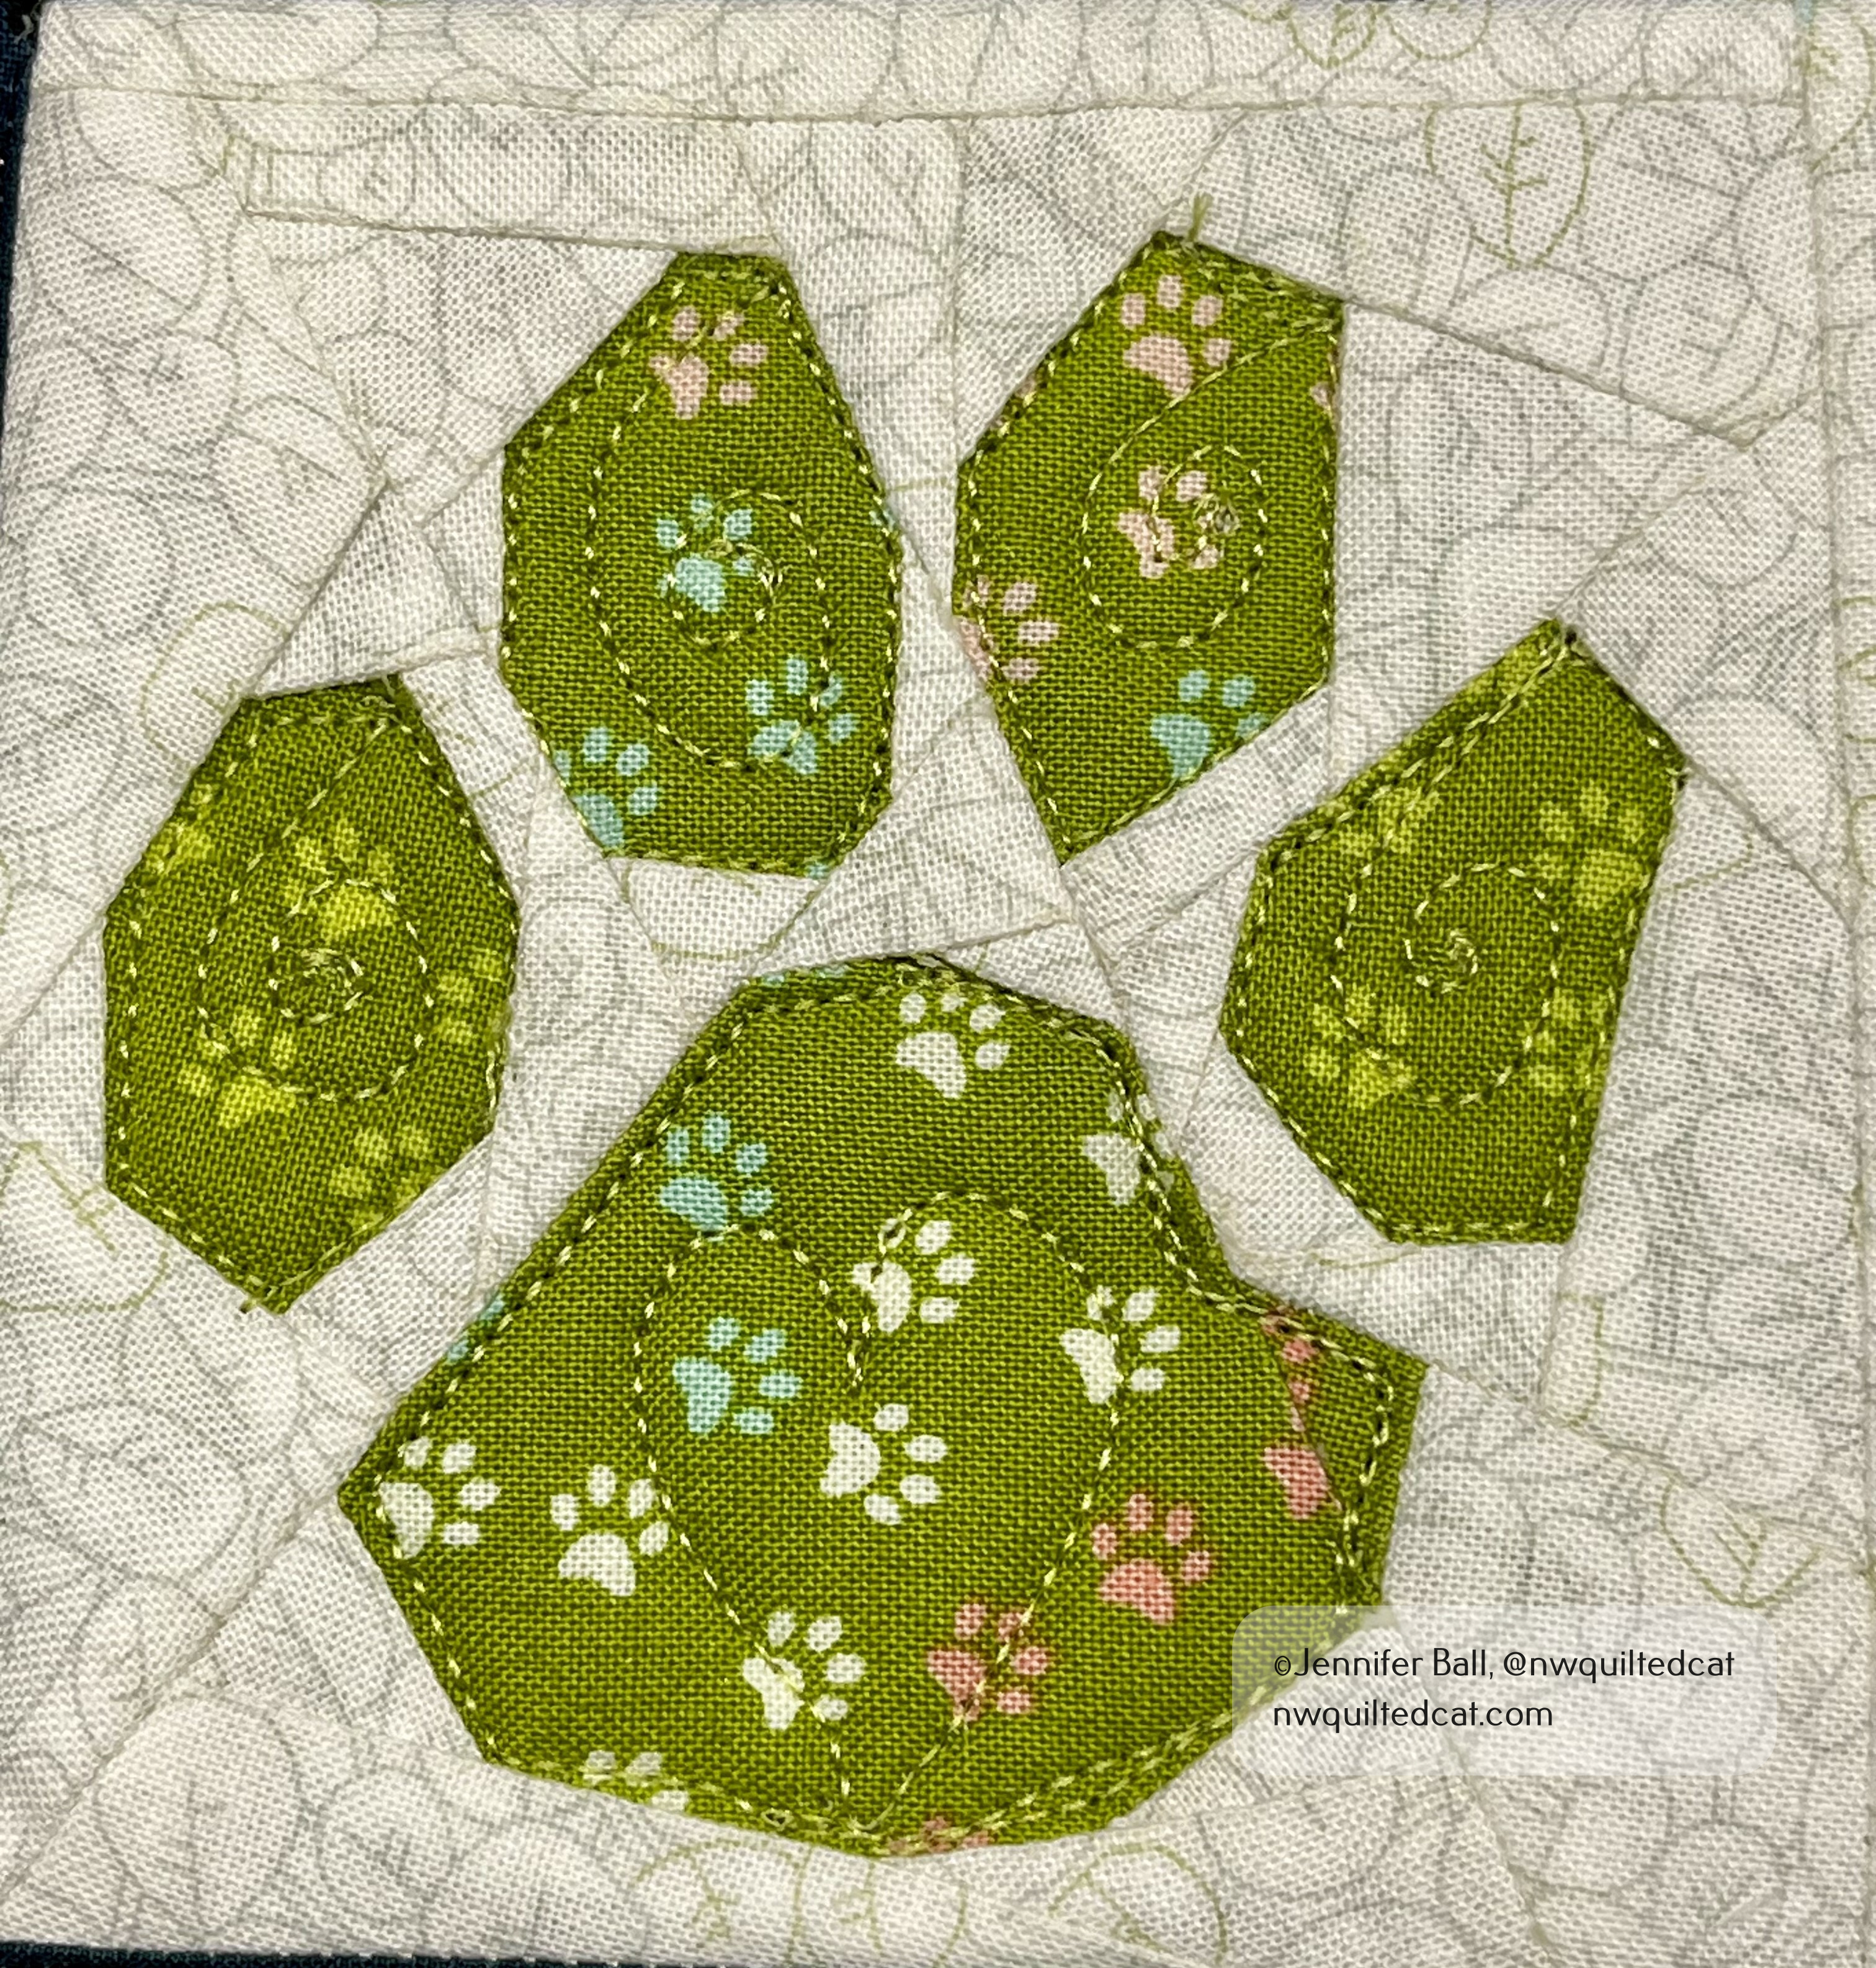
Last weekend, I loaded Meowville onto my frame to start quilting. I’m using Glide thread in Celery in the giant cat head and letters, and using Glide thread in black for the remainder of the quilt. I’m going to keep the quilting very simple to keep the focus on all of those wonderful tiny houses!
Time for quilting!A cute heart quilted into a paw
I’m about 2/3 of the way finished with the quilting, and I expect to finish this week. I’ll post a picture of the completed quilt soon! I have 2 more quilt tops ready to be quilted for the show so I need to get to it!
Last year, I participated in a weekly tiny house sew along designed by Quilt Art Designs. These are 6-inch blocks with very small foundation paper pieced sections with a total of 36 houses. This project was designed as a scrap buster, but my scrap bin is still overflowing!!
I kept up with the weekly sew a long and you can find all of my individual houses posted to my Instagram account @nwquiltedcat or by searching on the hashtag #meowvilletinyhouses.
For my houses, I decided that I wanted to incorporate little cats into each house. I fussy cut various cat faces and cat bodies and pieced them into each block.
I put these blocks to the side for a few months to ponder how I might finish this project, and I recently put them up on my design wall. These are all of the tiny houses pieced together in rows, but the rows are not yet sewn together.
I decided to call my little village, Meowville! I used paper pieced letters designed by Sam Hunter in her book, Quilt Talk.
Meowville banner for my tiny house village!
I’m leaning towards adding an inner solid border around the tiny houses, and then adding a wider outer border with the Meowville banner, some paw prints, and maybe a paper pieced cat or two. Stay tuned!
I have a wonderful dog companion named Pepper. She is a great family dog, and she loves to go hiking and camping with us. She is 31% German Shepherd, and loves to patrol and keep a careful eye on anyone walking down the sidewalk. Her favorite thing in the world is to go for walks, followed by chasing squirrels. She does not have a keen interest in being a quilt inspector, unlike her cat brother, ha, ha!
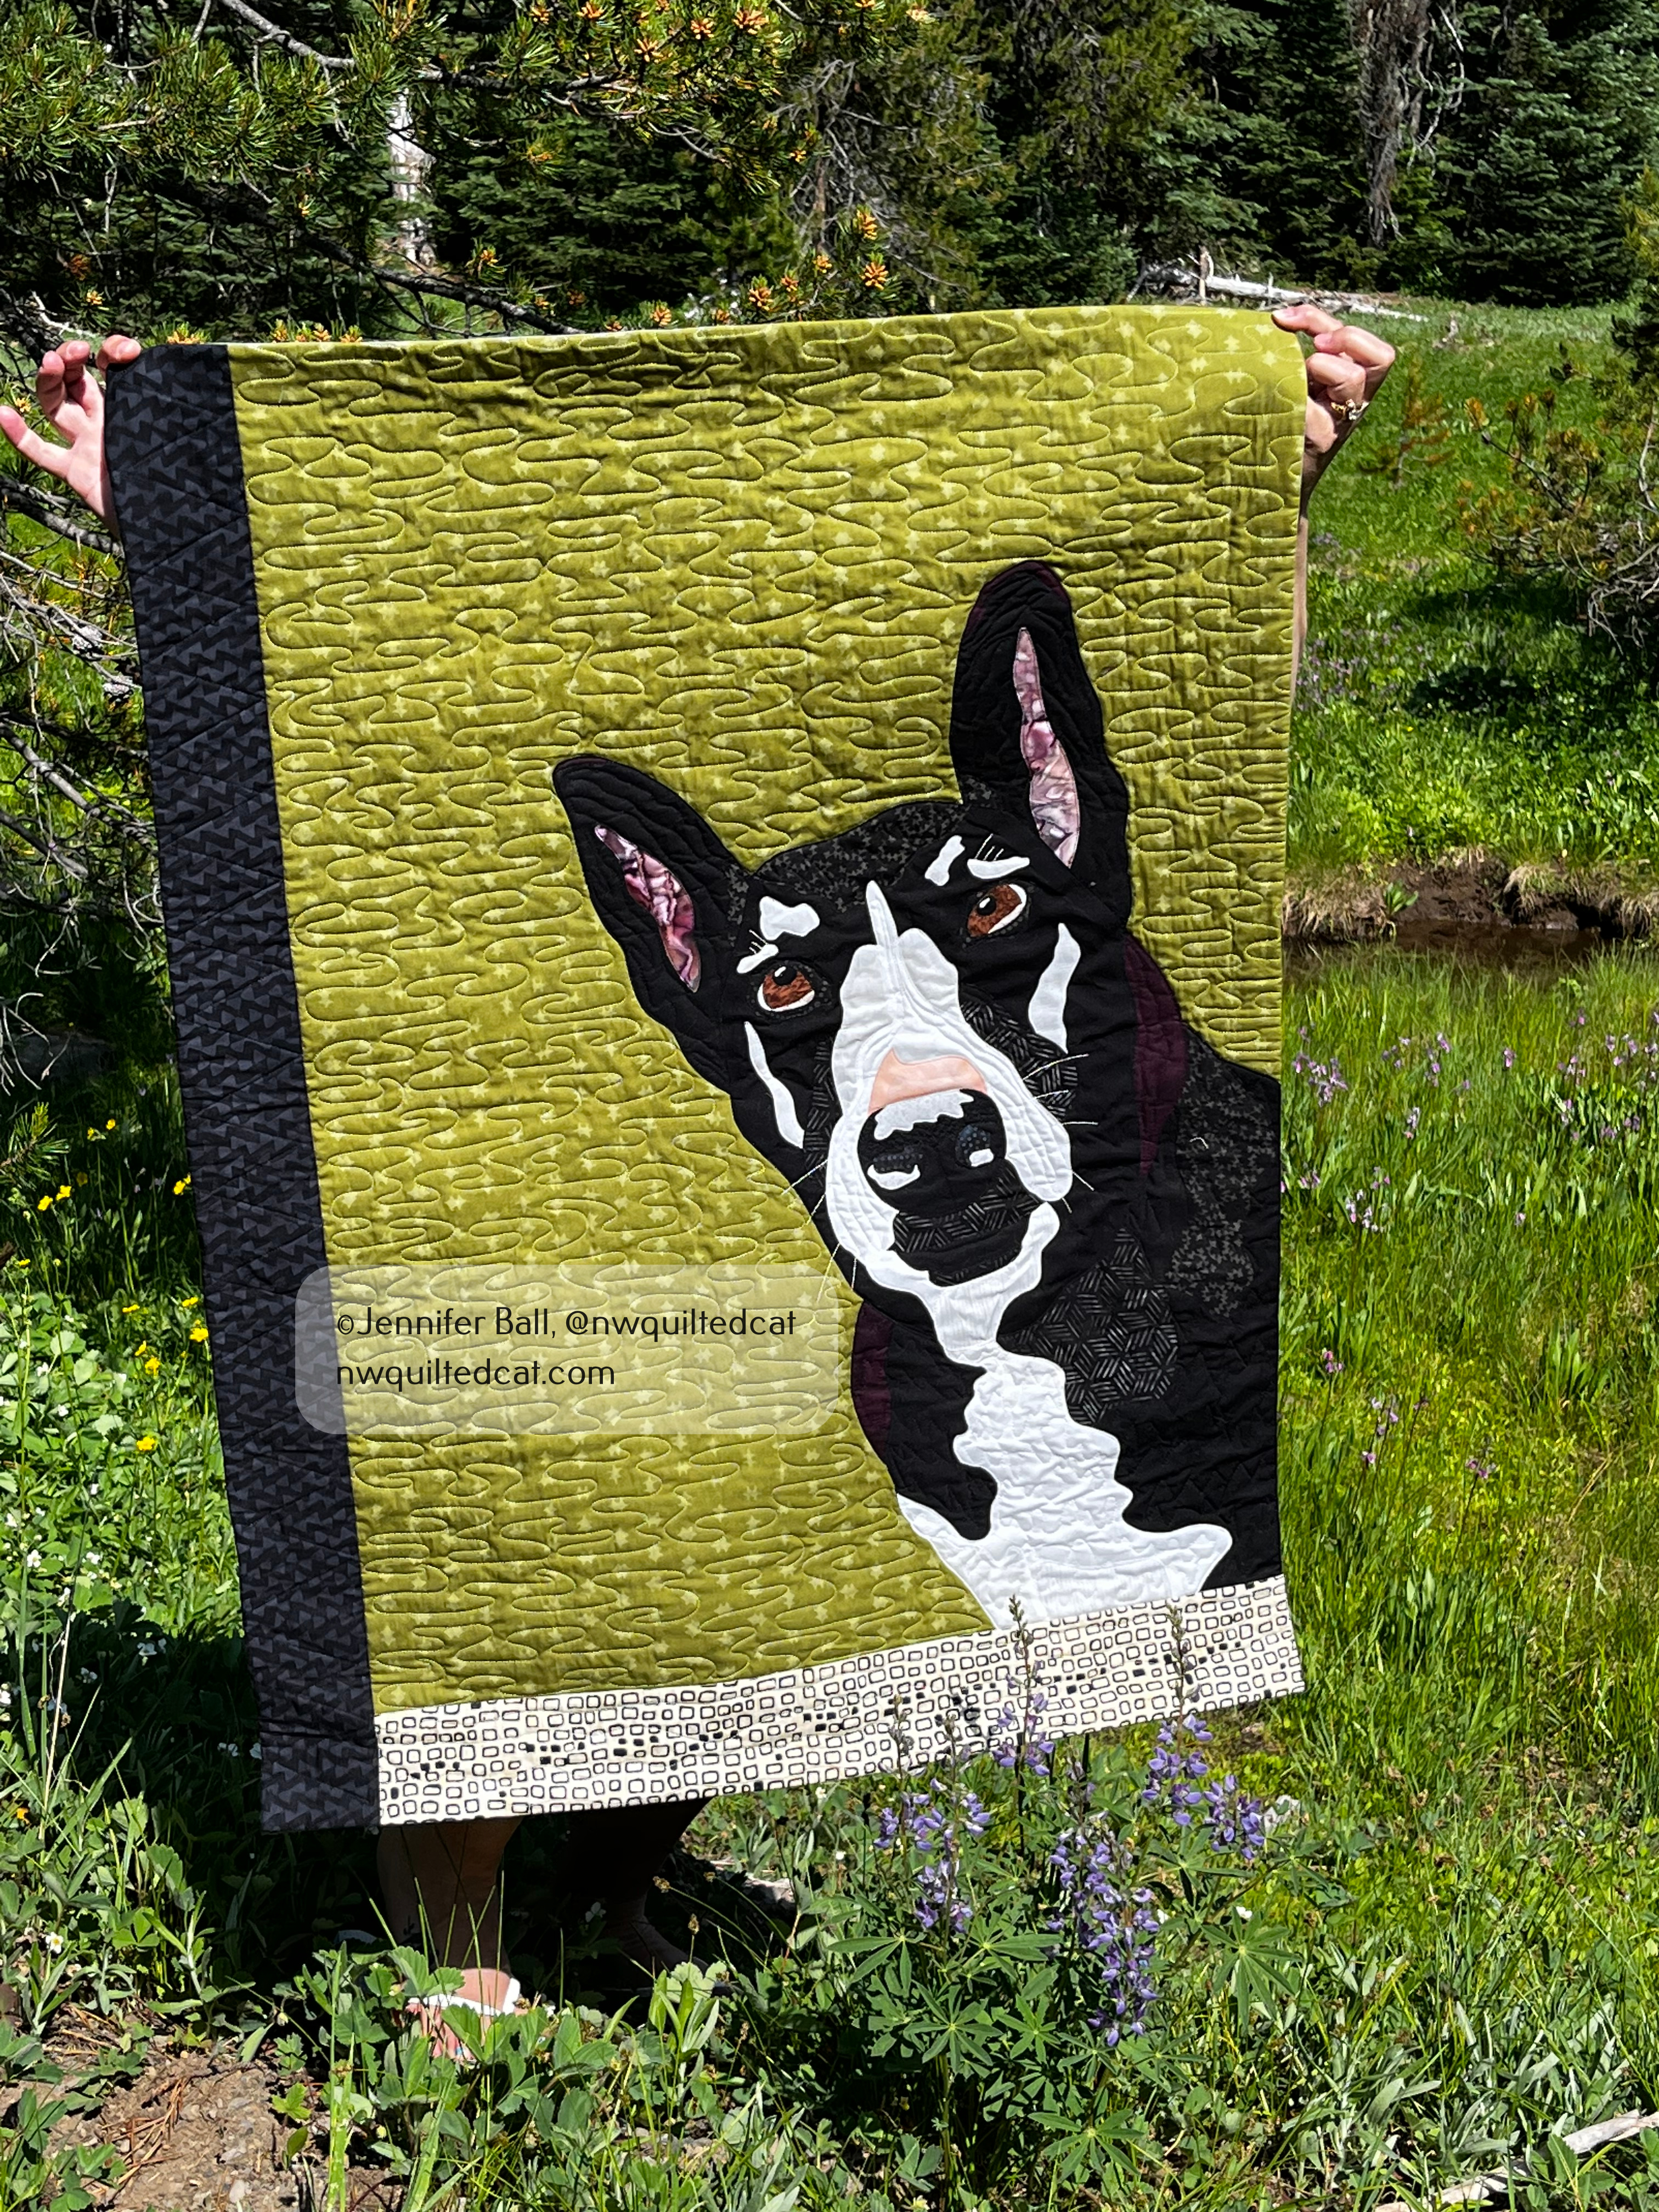
Last year, I had the wonderful opportunity to take a 3-day class at the Stitchin Post in Sisters, Oregon with the amazing June Jaeger. The class focused on creating pet portraits out of fabric and fusible web. I decided that I really need a pet portrait quilt of my best girl!
I had this wonderful photograph of Pepper that I snapped during one of our hikes to a waterfall. I was taking a picture of the waterfall when Pepper leaned her head over to see what I was doing while I snapped the pic. I then dubbed it: Pepper’s Selfie! It just captures her cute, inquisitive face so perfectly.
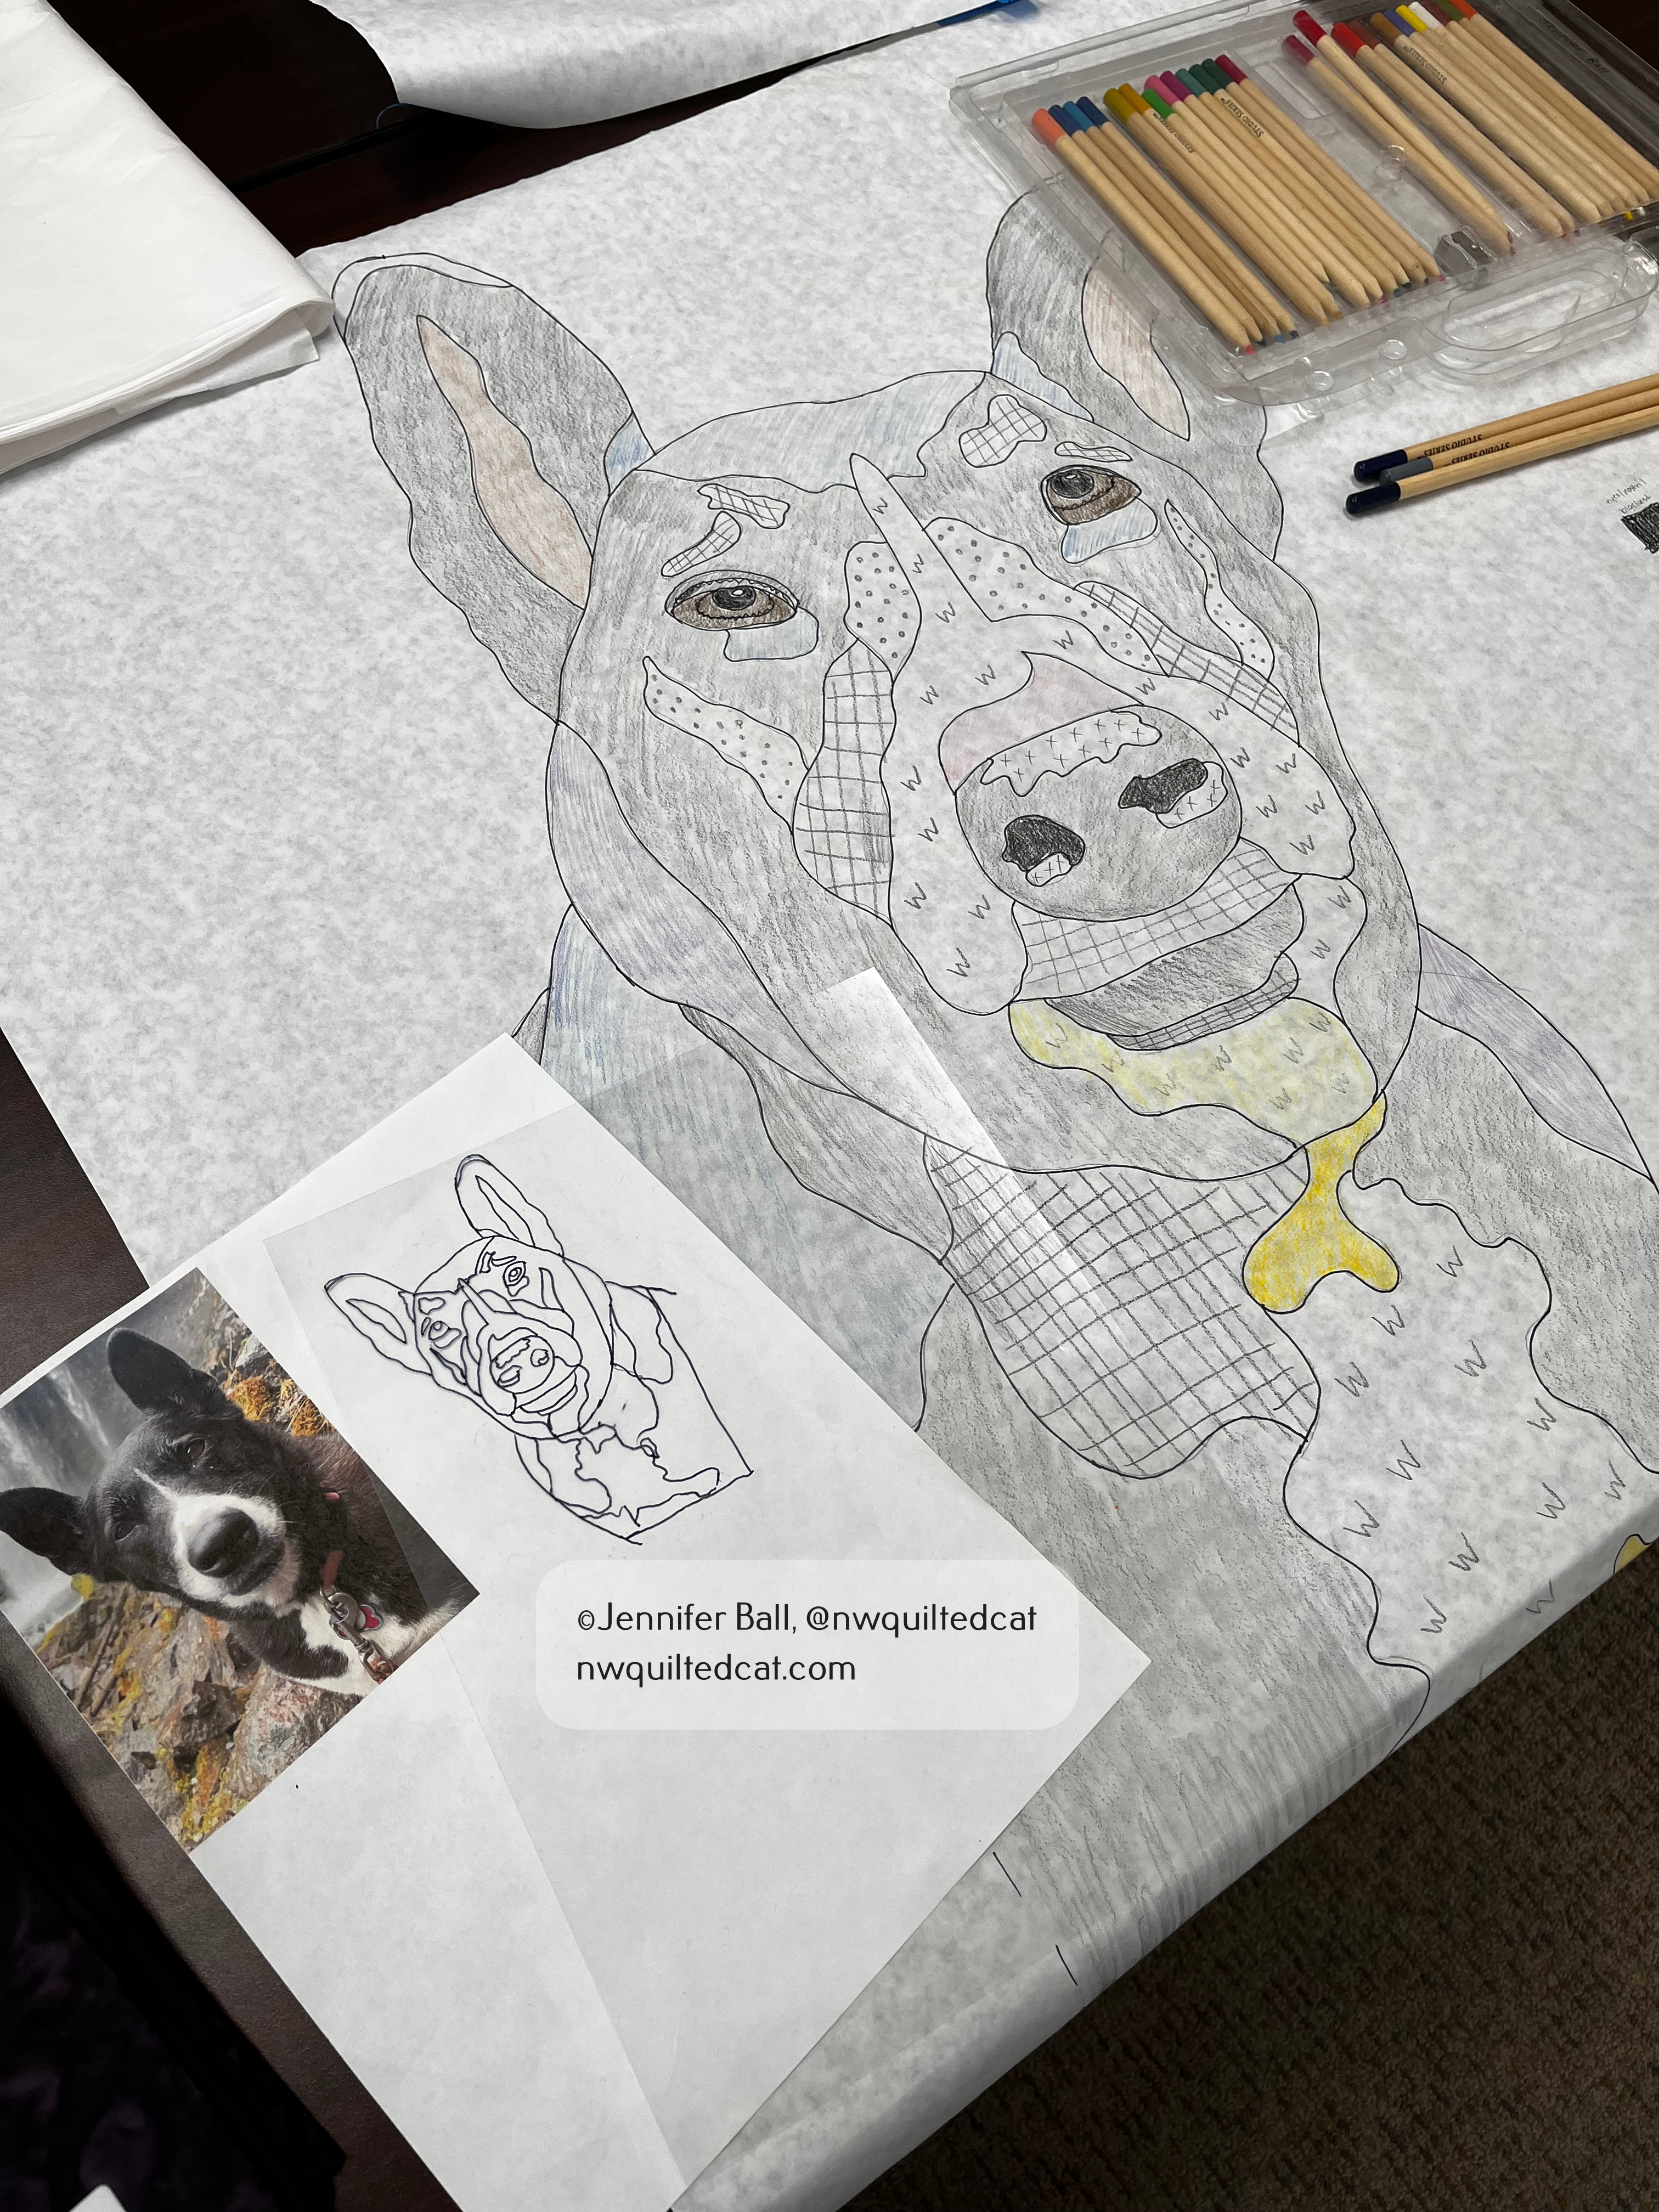
In the class, we prepared our patterns using our photos. We enlarged these photos and traced them in reverse so that the final quilt would be facing in the correct orientation. The colored pencils are matched with fabric swatches to create a code.
Pepper’s Selfie pattern in progress
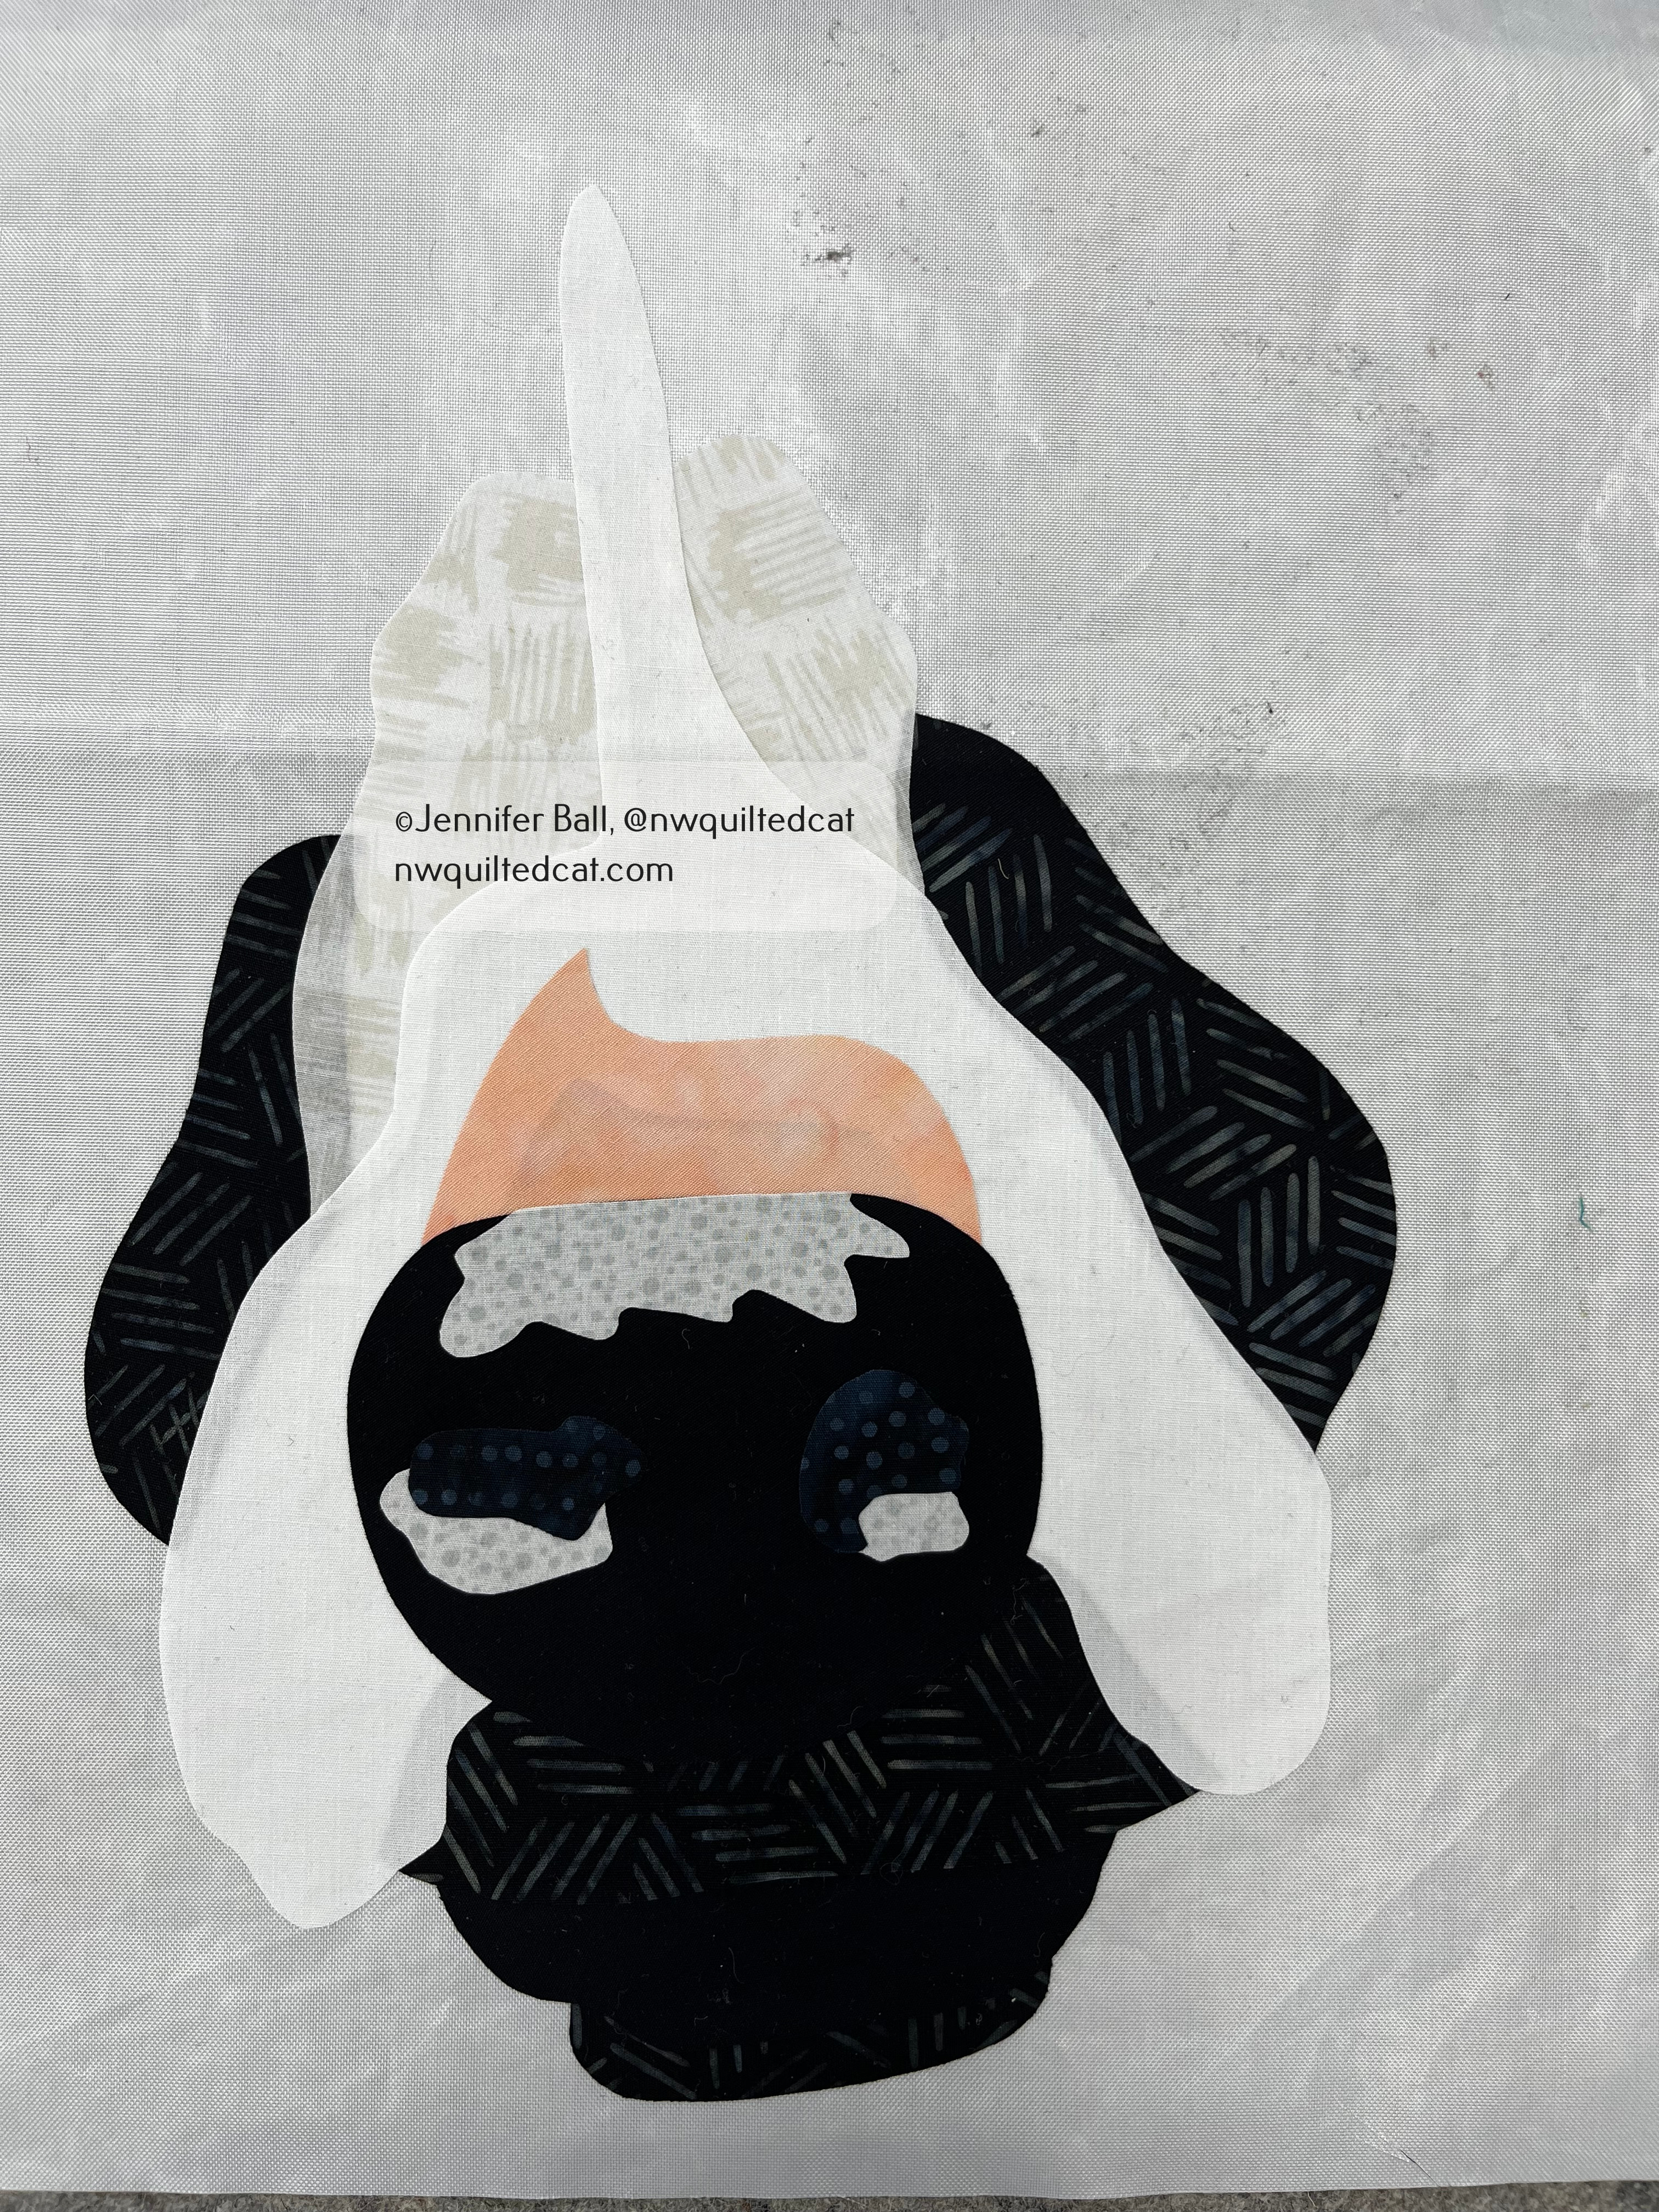
Once we had prepared our patterns and made our fabric swatch codes, we could then start creating our pet portraits. I started with Pepper’s nose. This is a layering technique to give the perspective of the nose being closest to the viewer while the cheeks are farther away. You could almost envision that fabric nose sniffing you!
Pepper’s nose takes shape
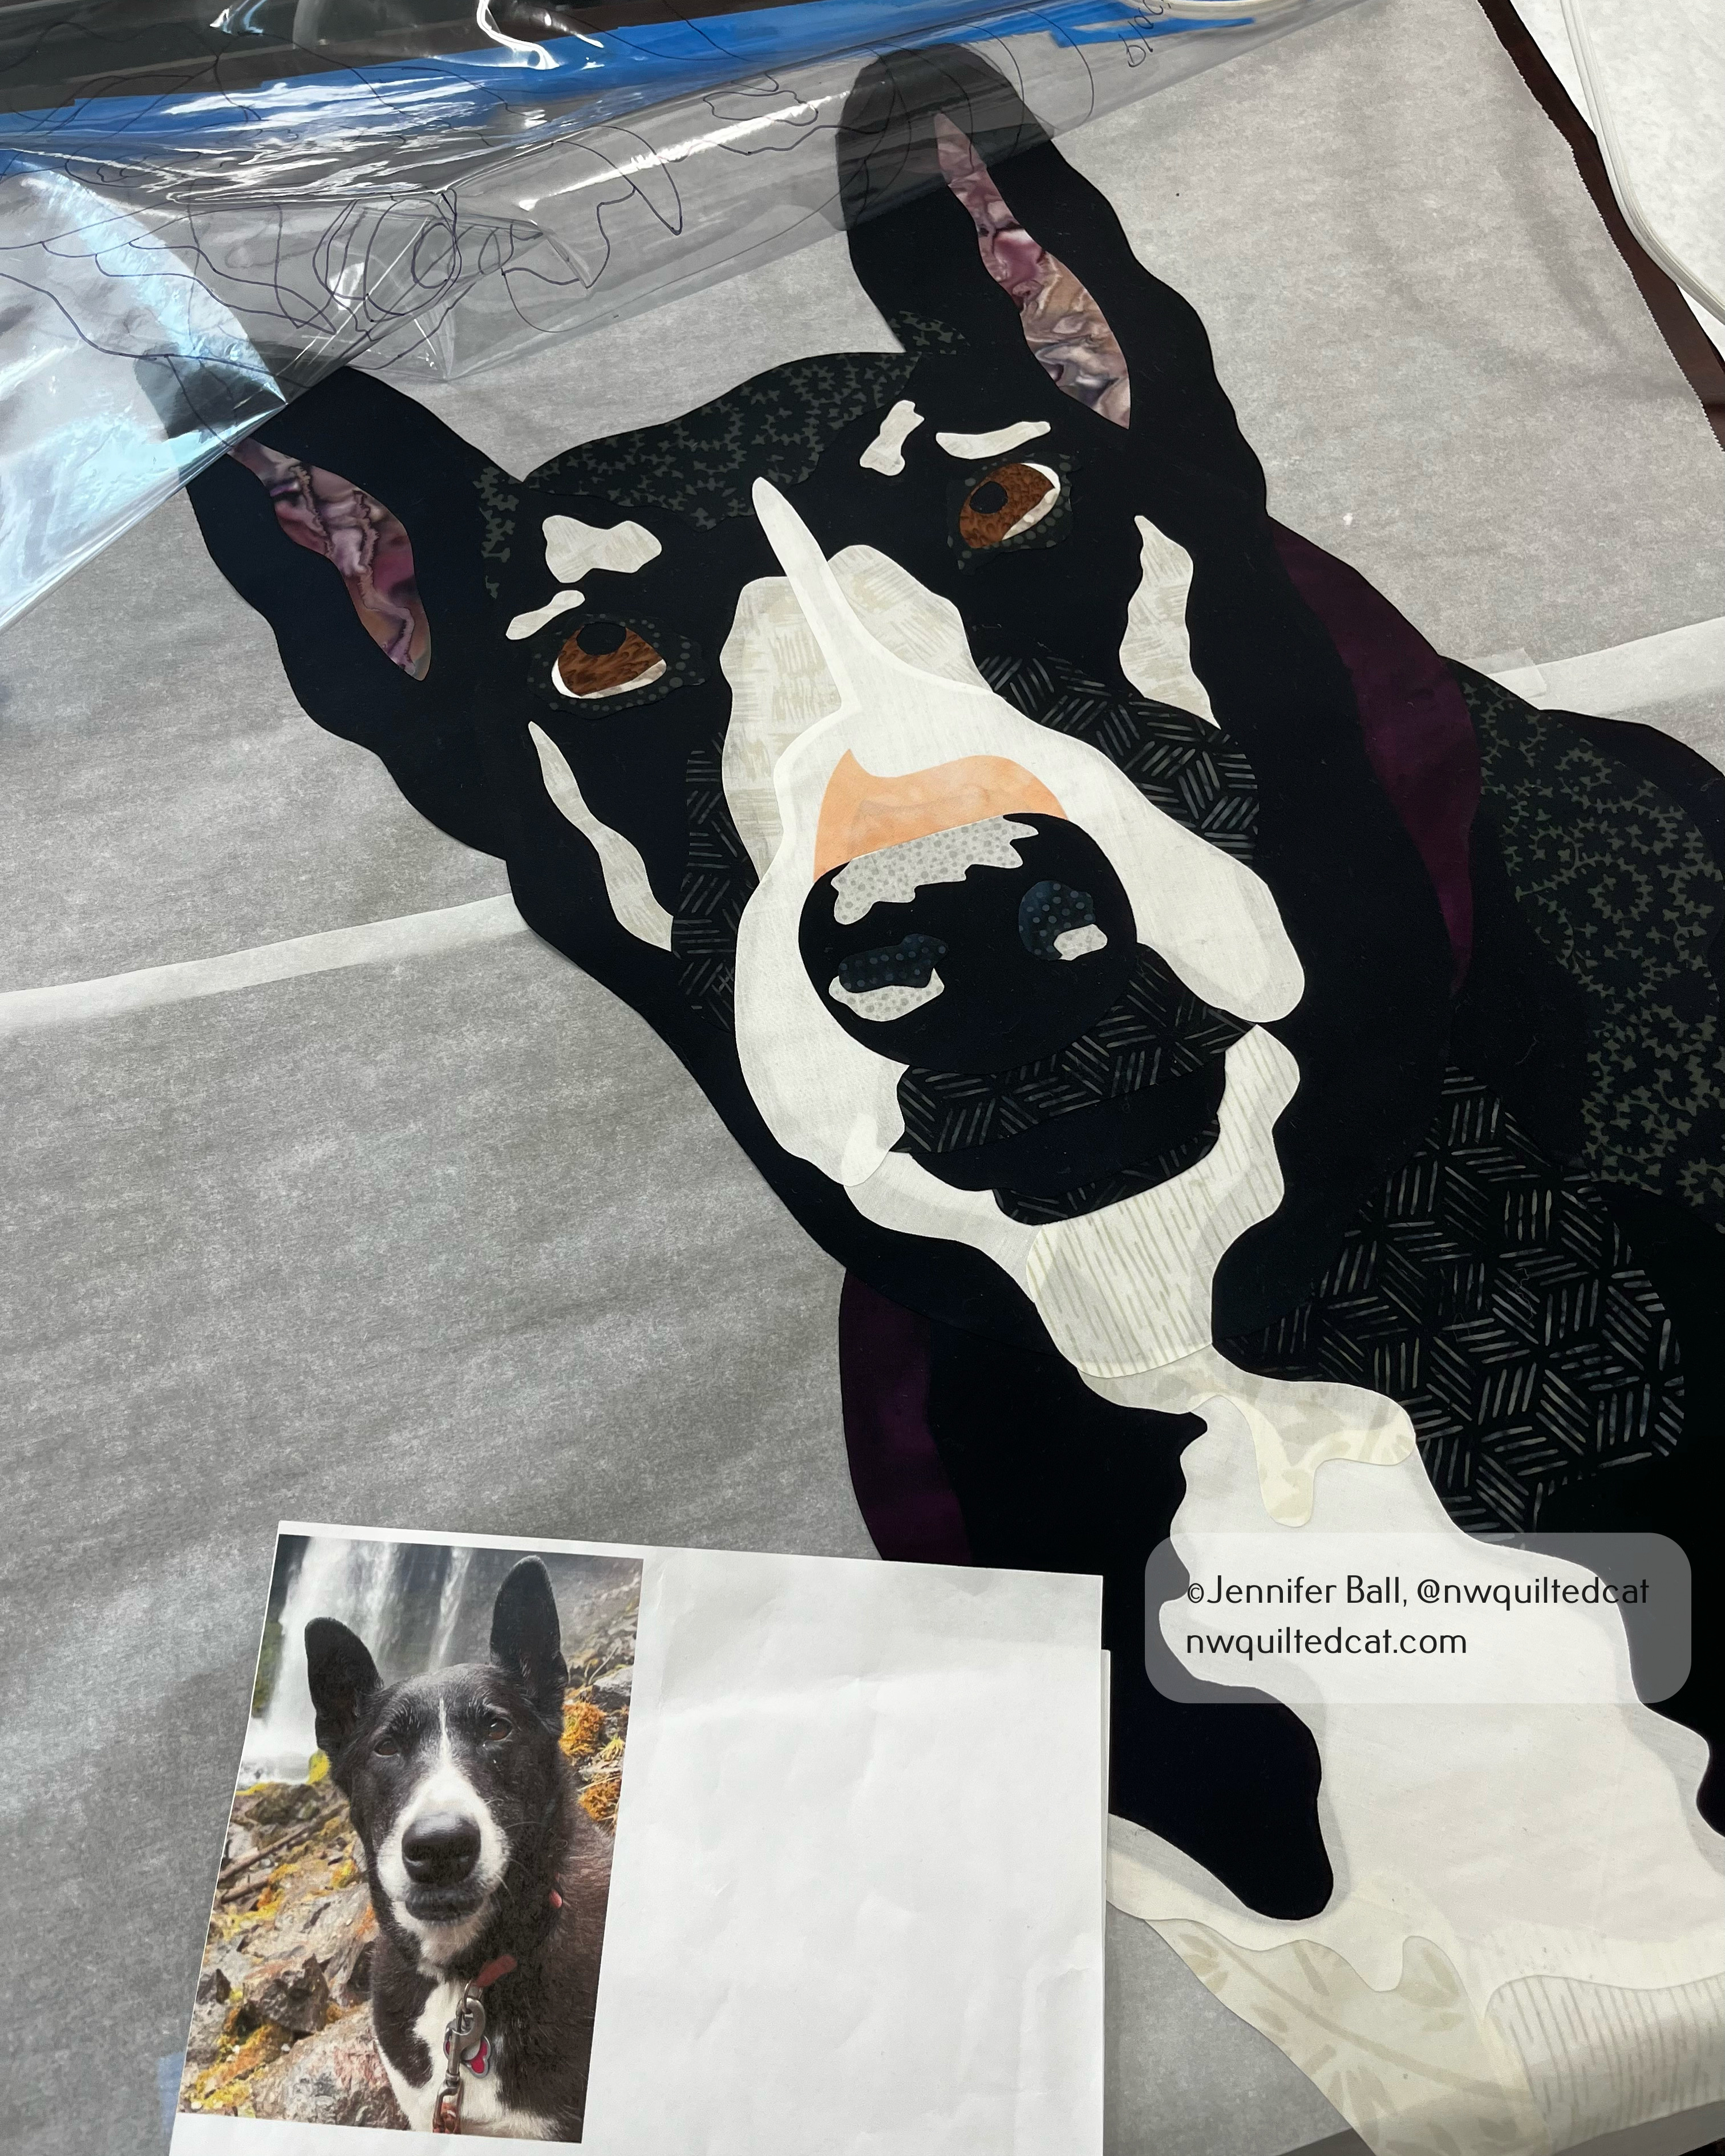
The fabric layering process continued throughout the class. My pet portrait featured a close-up of Pepper’s face so I didn’t have details such as paws and tails to add. Due to this cropped photo of Pepper, I was able to get my fabric collage completed in the 3-day class. If I had used a full body photograph of her, I probably would have needed a couple of more days at home to finish the portrait. I only used batik fabrics in this quilt because it doesn’t fray like regular quilting cotton fabrics.
After class, I carefully took my pet portrait home and thought about how to finish it. I added a black border to the long side opposite of Pepper for balance, and a fun cream batik for the bottom border.
I secured the edges of all the appliqued pieces using my regular Bernina and color matched the thread to the fabrics. I stitched in details such as whiskers and added sparkles to her eyes. Once I had finished, I then quilted the background on my HQ Avante using Glide thread in Celery.
Pepper’s Selfie quilt in the wild!
I really enjoyed making this quilt, and I definitely want to take this class again. There are so many invaluable techniques that June teaches in this class, and I highly recommend it!
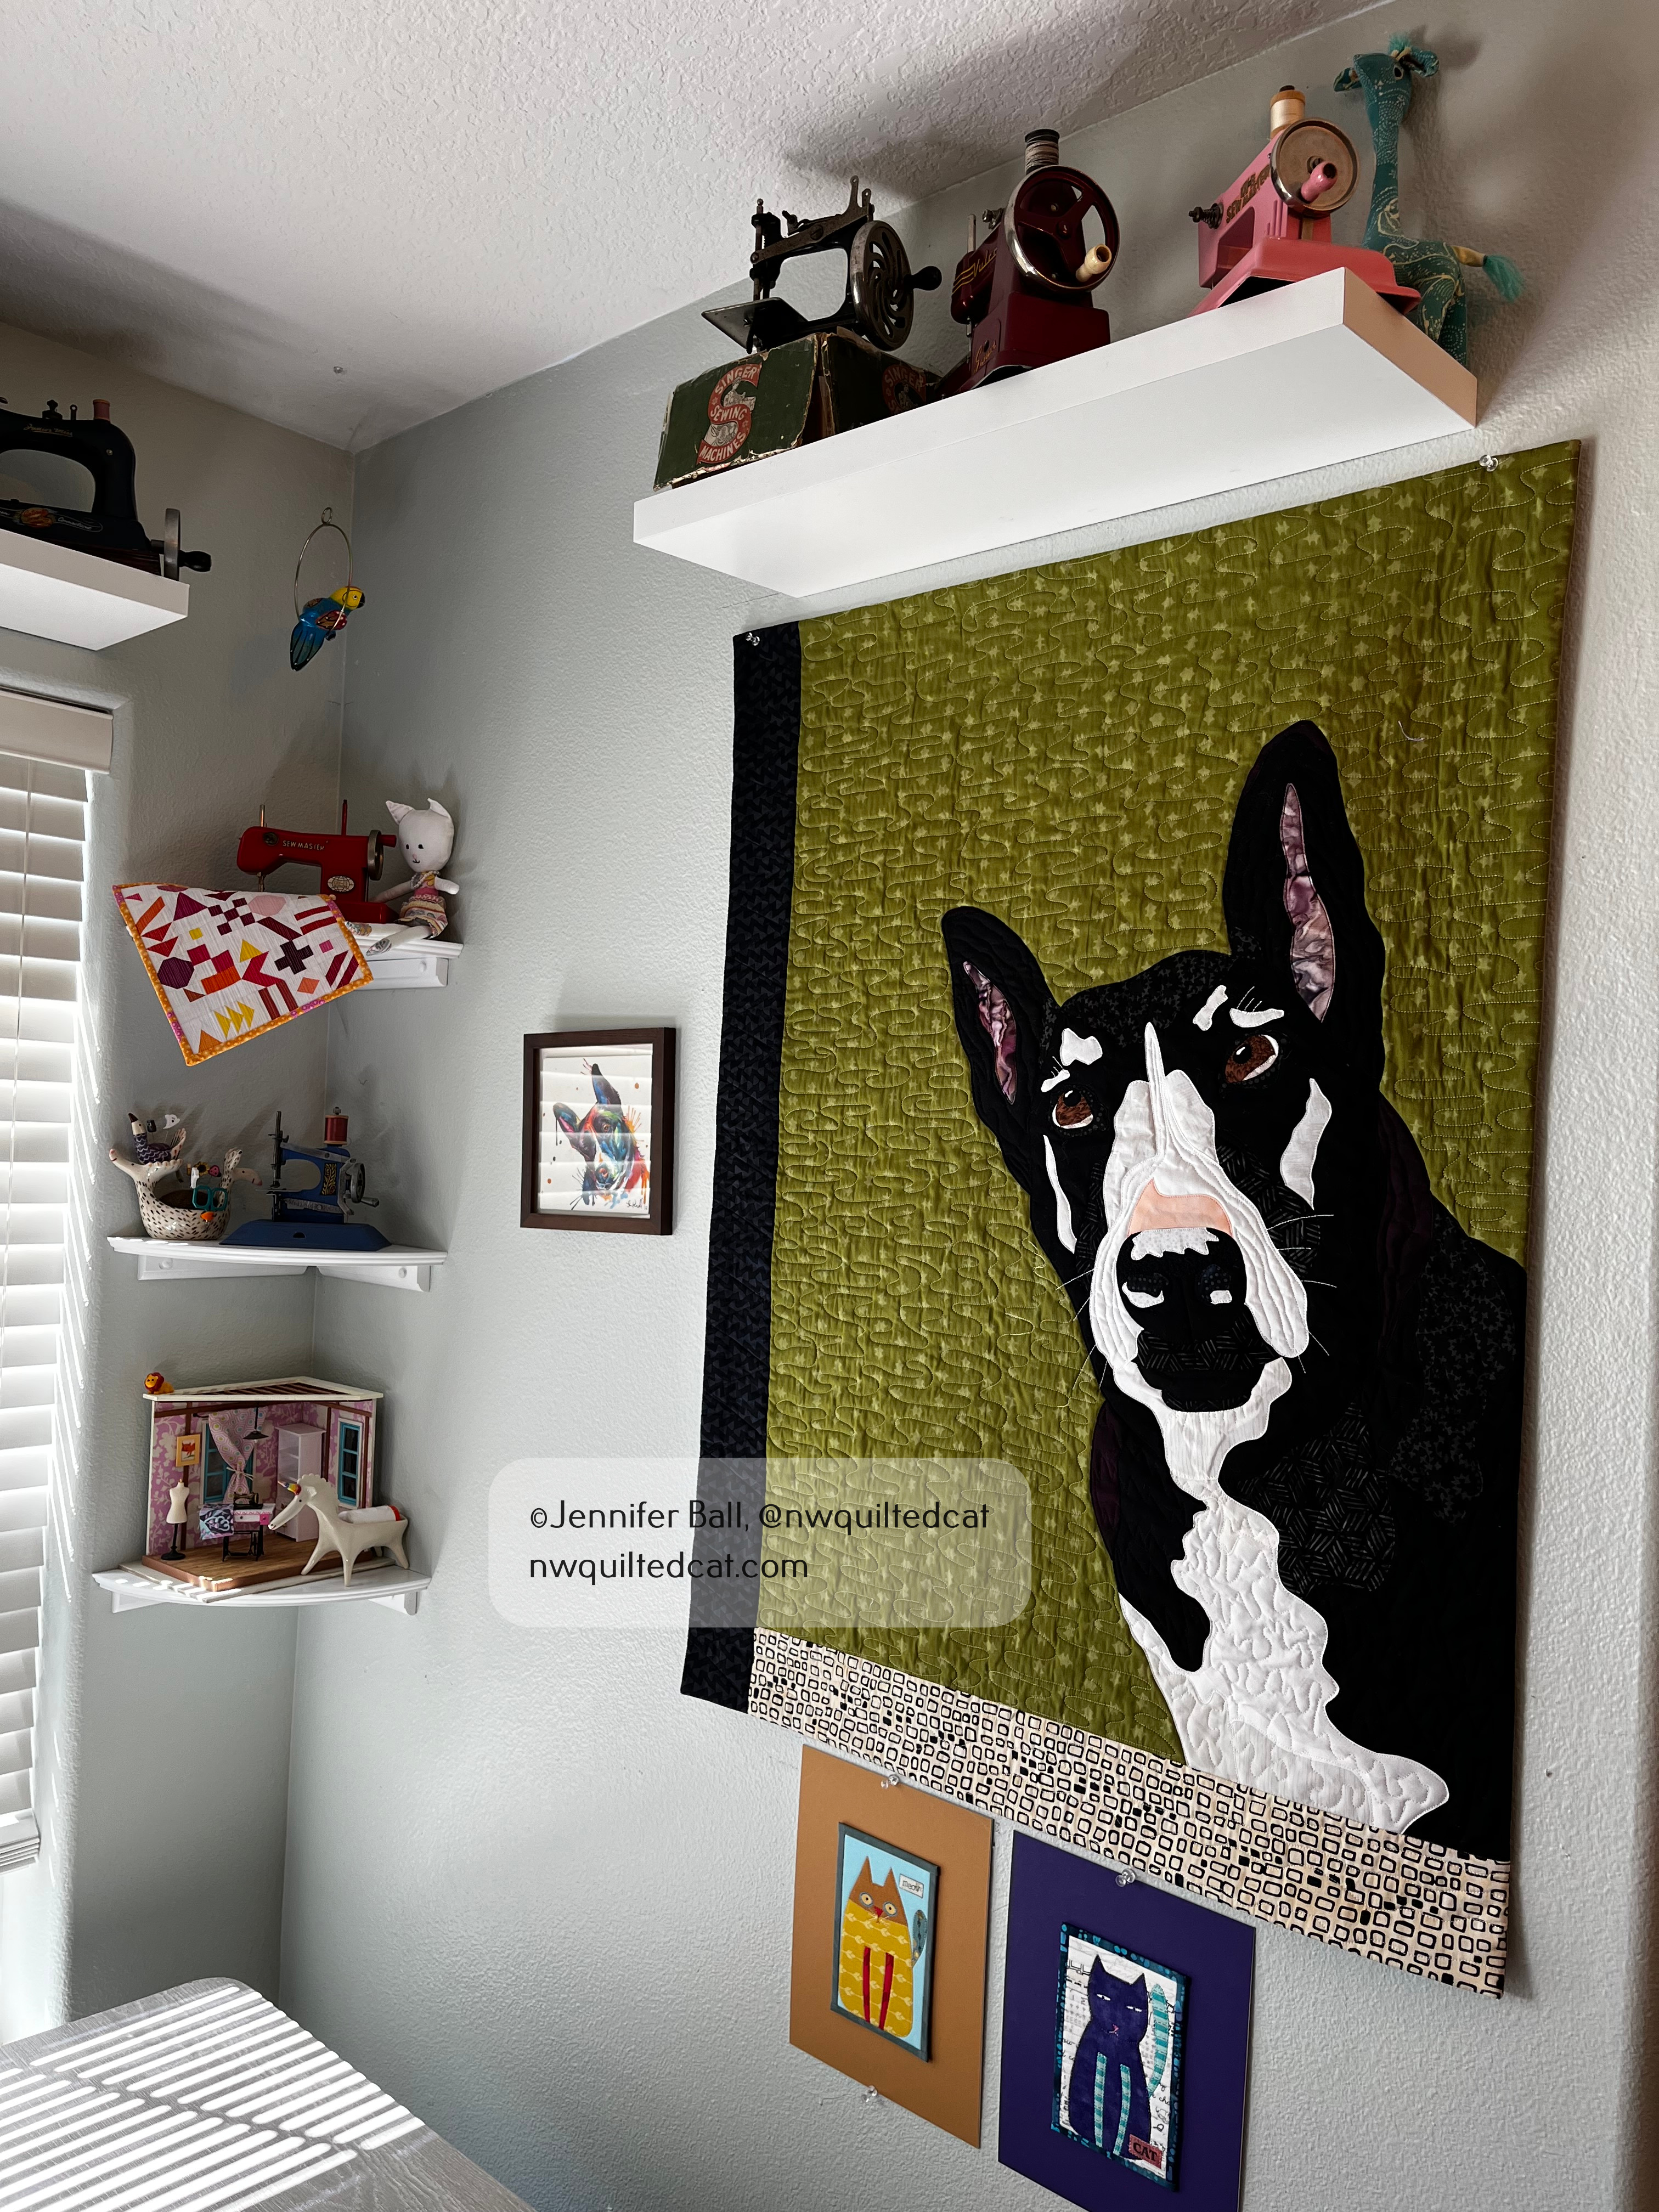
Here’s a look at where Pepper’s Selfie quilt hangs in my sewing room. When I sit down to sew, my good girl looks down upon me. Aww, how sweet!
A few years ago, I signed up for a whimsical woodland quilt block-of-the-month program with Fig Tree & Co. I kept up with the blocks for about the first 4 months or so, and then you know what happened! Time got away from me, and I stored the remaining blocks for a “someday” project.
One of my goals for this year is to catch up on some of my quilts that are partially completed. I still plan to work on new projects, but I do want to devote some time to these WIPs. I pulled out the Woodland Wonderland project recently, and just started sewing on it every evening after work and on the weekends.
When I pulled out the remaining blocks, the project did look overwhelming initially. I decided to pull out one block at a time and really took the time to enjoy sewing each block. I started with this cute little owl block:
Owl block from the Woodland Wonderland quilt
The eyes are woo felt that I appliqued after constructing the block.
I started to feel my enthusiasm for this project coming back, and I quickly moved on to other blocks:
Gnome block and mushroom block from the Woodland Wonderland quilt
I cleared a space on my sewing room floor to place the blocks that I had completed so far, when my quilt inspector, Romeo, jumped up onto to his special chair to supervise the job:
Romeo inspects my progress on the Woodland Wonderland quilt
He could see that I still had many blocks to complete so he went back to sleep. In the meantime, I kept sewing in my free time and enlisted another one of my quilt inspectors, Pepper. She isn’t as skilled as a cat quilt inspector, but she did her best inspecting this block:
Pepper tries to be a quilt block inspector. Romeo needs to give her more training!
In January, our teen had a band retreat down at the coast. I thought that would be the perfect opportunity to get some photos of my completed quilt flimsy. It was pretty chilly and windy, which made getting good photos a bit tricky. My husband and I stayed at a cute little motel, and he held up the finished quilt top while I took a few photos in between wind gusts.
Woodland Wonderland quilt flimsy at the Oregon coast
The motel had these fun red railings that I thought accented the quilt rather nicely. It used to be a U.S. Coast Guard lookout station in the 1940s. The most recent owners have remodeled it with a vintage vibe, including turntables in each room. You can check out LPs from the front office.
Here’s a close-up look at the quilt flimsy:
Close-up of the Woodland Wonderland quilt flimsy
I did tweak a few things in my quilt from the original Woodland Wonderland pattern. I omitted the column of flying geese from the side next to the trees and stars. I liked the look of the quilt better without the geese. I also added little blocks above the big mushroom blocks next to the gnome. I used those some blocks, slightly larger, and added them to the ends of the long vine blocks for balance.
I really enjoyed making this quilt. It’s all traditionally pieced with only a couple of appliqued features on the owl and hedgehog. The printed fabrics are all from the original block-of-the-month, and I think they are all Fig Tree fabrics. The background is black chambray from Moda, which really sets off all the green, red, and cream fabrics wonderfully!
Next up, how to quilt it? The quilt flimsy is going into my to-be-quilted pile. I want to finish up some piecing projects before tackling this pile.
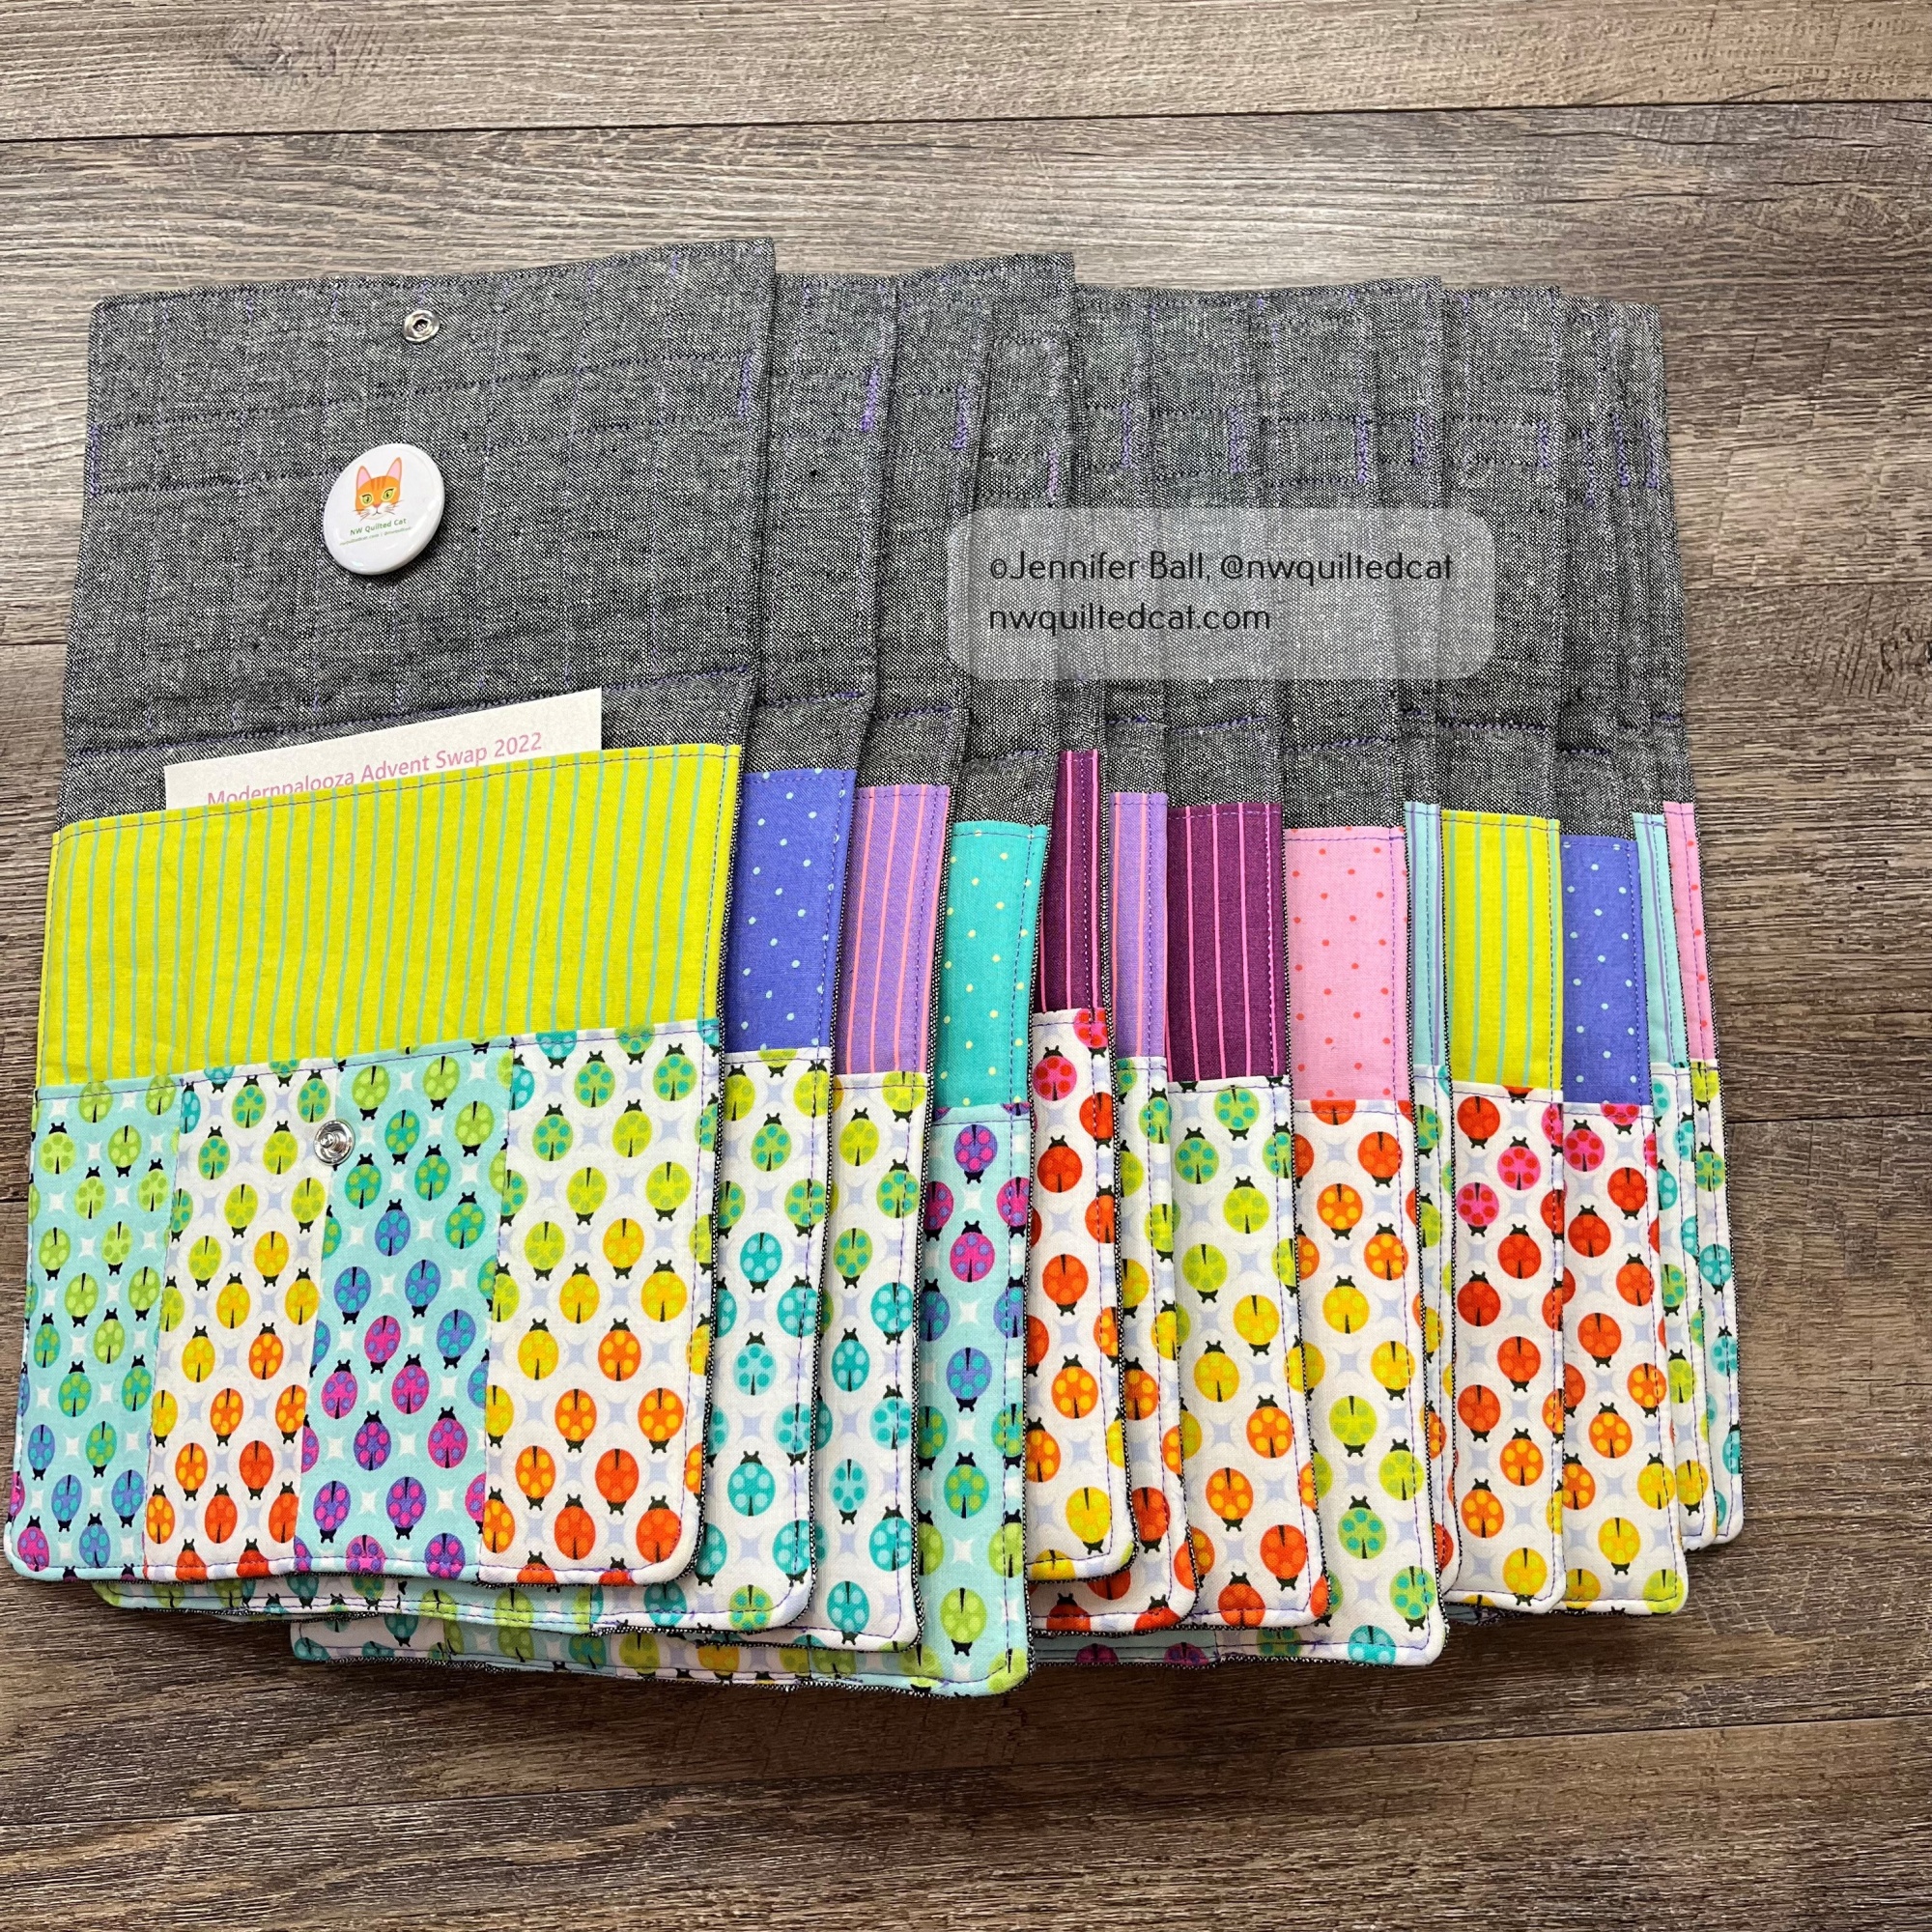
I recently participated in a holiday project swap on Instagram where participants made 13 items using modern fabric. In exchange, we received 12 items from other swappers and the extra items were auctioned off by the organizers.
I decided to make a mini rotary mat holder to use when going to quilt classes or retreats. I really liked the idea of having a little case to hold a small rotary mat and cutter for trimming up little foundation paper pieced blocks.
This project uses a free pattern from American Patchwork & Quilting.
I altered the pattern slightly by piecing a Deja Vu Parisville cameo into the back of each mat. I really wanted something that could showcase this large scale print, and this little project worked great. I used the Essex Yarn Dyed linen for a little extra structure and stability, and to provide a nice contrast to the bright Tula Pink fabrics.
Here’s a look at the front and back of 2 mini rotary mat holders opened:
The large pocket holds a 6×8 inch rotary mat. The smaller pocket is divided into 4 sections to hold small tools such as a rotary cutter, scissors, pencils, and more. I added a ribbon to each exterior flap for a cute accent.
Each holder uses the same Painted Ladies fabric in alternating “glow” and “glimmer” colorways. The “glow” colorway is the white background and the “glimmer” colorway is the aqua background. I had a fat quarter stack of the Tiny Dots and Stripes prints so I used a different one for each rotary holder. I really love how colorway these little cases are all together!
Everyone in the swap wrapped their items so that participants could unwrap one item a day for the 12 days leading up to Christmas.
I wrapped my items in a polka-dot printed paper with a pink ribbon:
I really enjoyed participating in this swap, and I received some really fun items in return! This project comes together pretty easily if you want to make one for yourself or as a gift for a quilting buddy.
Are you looking for a cute and not scary block for Halloween? How about a cute little cat face on a pumpkin? This adorable block will work on trick-or-treat bags, table runners, mini quilts, and larger quilts.
Pattern
For a limited time, this cute cat jack-o-lantern quilt pattern is on sale in a favorite Halloween craft magazine. You can choose to purchase a hard copy that is mailed to you or a PDF download, which you can download to your computer.
Here’s a look at my block:
I loved using a pumpkin-themed fabric for my cat face! Aren’t those little cat-faced pumpkins with fangs just adorable? I want to make several different fabric combinations using different oranges, blacks, and low-volume backgrounds and create a lap quilt.
For my block, I used the following fabrics:
Background fabric: white dotted fabric from “Too Cute to Spook” by Me and My Sisters Designs.
Cat and handle fabric: purple/orange pumpkin fabric from “Bring Your Own Boos” by Cotton + Steel
Pumpkin fabric: orange fabric from “All Hallow’s Eve” by Fig Tree Quilts
This block is a great stash buster, and you can really have great fun with different fabric combinations. I love seeing a cat face block with the whiskers. It adds a nice element of whimsy to the block.
The quilt pattern in the magazine has a great layout with plus-shaped blocks added between rows of cat jack o’ lanterns and makes a finished quilt at 45″ x 48″.
I completed a new quilt called Black Diamonds from the Fat Quarter Shop. This quilt features a new ruler called the half triangle trimmer, which helps you to create perfect 2″ x 4″ half rectangle blocks.
If you purchase the supplies for this quilt using the links in my post, I get a small percentage of the sale to help offset the costs of running this blog. I appreciate any and all purchases via my affiliate links!!
Quilt Kit and Pattern Available Soon!
The Fat Quarter Shop will be announcing this new quilt pattern and quilt kit later in August or early September so watch for an announcement on their social media. The quilt kit will feature a fabric line called “Create” by Alli K Designs.
For my version of the quilt, I used the Too Cute to Spook line by Me and My Sister Designs. I thought this pattern would make a really cute Halloween themed quilt.
Supplies for my Black Diamonds quilt: Too Cute to Spook Fat Eighth bundle, background fabric, pumpkin fabric for center blocks, binding fabric, half rectangle trimmer, and pattern
This pattern is really simple to make because it only contains 2 blocks: a star block and a diamond block. Both blocks use the half rectangle trimmer. I decided to make a test block before cutting out all the pieces and chain piecing.
Here’s my test star block:
Black Diamonds quilt: a test star block
Usually, star blocks are made with half square triangles so I really like the look of this elongated star using the half triangle trimmer tool. It’s a really fun shape! I also made a test diamond block, which went together perfectly.
I decided to go for it and cut out all of my fabric pieces according to the directions. For my center squares in my star blocks, I used the same fabric for consistency. If you decide to go this route, then you’ll need a 1/2 yard of fabric. If you go scrappy, then you could use fat eighths or fat quarters.
TIP: A Stripology ruler saves you so much time and effort when cutting out strips of fabric.
I chain-pieced the star block units first and then the diamond block units. In this pattern, pay special attention to directions because you need to make right-side facing units and left-side facing units.
TIP: Use a Sue Daley rotating cutting mat when trimming your half rectangle units. As a bonus, I also use this mat to cut out pieces for English paper piecing.
Here’s a look at all my completed star blocks and diamond blocks:
Completed blocks for the Black Diamonds quilt
Aren’t they cute? When I pieced the units together, I didn’t worry about having 2 of the same fabrics touching each other. There is so much movement in the finished quilt that no one will notice!
After I had completed all these blocks, I laid them out on the floor with the help of my quilt assistant. As a way to check my placement, I usually take a picture with my cell phone. This picture helps to identify any block placement mistakes, and it also helps me to remember what order I need to sew the blocks.
My quilt inspector checks my block placement!
My quilt inspector sometimes likes to rearrange things when I’m not looking! I sewed the rows together and finished the quilt flimsy in time to take on a little mom and son hiking trip. My son was a good sport and held up the quilt top while I took a quick picture.
Black Diamonds quilt flimsy
Once home from our short adventure, I decided to quilt it with an open free-motion stipple pattern using white thread. For the binding, I used a striped fabric from the Too Cute to Spook line, which I think is the perfect finishing touch for this quilt!
Here’s a look at my completed Black Diamonds quilt, Halloween style!!
Completed Black Diamonds quilt
This quilt finishes at 60.5″ x 60.5″ so it’s a perfect lap size. You can easily enlarge it by making more blocks to expand it, and be sure to watch the Fat Quarter Shop for a blog post announcing the pattern and quilt kit plus a look at all the sample quilts. Watch for a live tutorial by the Fat Quarter Shop launching on September 8th.
One of the things that I really enjoy doing is stargazing, especially while traveling. I love to go on road trips to some dark sky parks around the west each summer with my husband and teen. We usually just have a blanket, some snacks, and maybe a pair of binoculars.
During a recent quilt retreat, I started working on blocks for a stargazing quilt. The pattern is called Nocturnal Sky by Natalie Crabtree for Gingiber. The quilt has a modern feel with curved pieces representing the moon and clouds.
There are two types of traditionally pieced blocks for the stars, and the composition of these blocks in the quilt remind me of looking at twinkling stars at night.
I finished all of my “A” star blocks, and I’ve started working on my “B” star blocks . Some nights after work, I can only manage to sew part of a block and other nights, I can sew two or three blocks. I’m taking this quilt nice and slow, while working on other projects.
Here’s a look at my “A” star blocks all pieced. The inner squares are light green.
My “A” Star Blocks
Do you see my little helper? He couldn’t help inspecting these star blocks as soon as I tried to photograph them.
I’m thinking about backing this quilt in a cozy flannel so that it can be a traveling quilt when we go on a road trip or go stargazing.
I needed a fun and useable container to place all those little threads and small fabric clippings that seem to pile up while sewing. Fortunately, I happened to come across a swap for a quilt-as-you-go thread catcher on Instagram recently with a fun group of quilters called @modernpalooza.
For this swap, each person created a thread catcher using a free pattern by The Sewing Chick. The swap organizers matched us up with a secret partner, and sent us some hints as to their fabric likes and dislikes.
I decided to pull some Libs Elliott fabrics from my stash as my modern, bright fabrics to use for the patchwork scraps. I changed up the pattern slightly by deciding to add a black and white border to the top and lower edges of my colorful patchwork strip. I then added a smaller width of a dotted gray fabric for contrast.
I also didn’t have duck canvas on hand as called for in the pattern. Instead, I fused some Pellon Shape Flex to my lining fabric before adding the quilt-as-you-go fabric pieces.
For the binding, I used the same black and white fabric to echo the borders. I took my little completed thread catcher basket on a hike to central Oregon, and I think it looks great resting on this old juniper tree.
Thread catcher basket that I made for my partner
We were also asked to send a favorite treat or snack along with the bucket. I sent some Moonstruck chocolate made by an Oregon company along with some fabric and other little goodies. I didn’t think to take a picture of the complete package before I mailed it.
In return, I received a wonderful thread catcher basket from my partner!
Thread catcher basket that I received
My partner made me this super cute basket using Tula Pink’s Daydreamer fabric! Isn’t it bright and cheerful? She also very thoughtfully included some super rare out-of-print Tula Pink fabrics that I do not own. I’m very excited to use them in a future project just for me.
What I really loved about this little thread catcher basket swap is that the project was pretty small and not too time consuming. Sometimes, swaps can be overwhelming for people because they try to make something too complicated or underestimate how long it might take to make a larger item like a mini quilt. I do enjoy swaps because it gives me a chance to try new projects, learn new skills, and make new friends!
It’s no secret that I’m a cat lover! I’m currently owned by three cats, including one special foster kitty named Gracie. The three cats take turns playing musical laps, rotating on my lap so that each one gets some special petting and snuggle time. When I saw a new pattern by Elizabeth Hartmann called Cats in Space, I just knew that I had to make it as soon as possible.
I had a short quilt retreat recently with my sister and two of our quilting friends. I tossed this pattern into my bag along with some fabrics to make one cat block. Usually, I like to precut pieces for a quilt retreat, but I didn’t have time with this project.
I started by cutting out each section according to the pattern, and I labeled the sections with these amazing little plastic squares called Alphabitties. I take each label and clip it to the fabric piece using a Wonder Clip. These Alphabitties labels are game changers for patterns with tons of little pieces that can be easily confused with one another.
I did notice a possible pattern error related to the diagrams. If you look at the picture on the pattern cover, the space pack on the cat’s back is higher than in some of the pictures inside of the pattern. The pattern pieces (V, GG, and HH) are sized so that your space pack comes out shorter than the pattern cover photo. I adjusted these few pieces so that my kitty’s space pack is the higher version.
Here’s a close-up view of the space kitty:
Isn’t the background fabric fun? It has little fireflies, shooting stars, and constellations. It’s called Night Sky by Dear Stella. The other fabrics are from my stash. I used some Alison Glass pink fabrics for the space suit details, some sparkly Essex linen for the helmet, and Kona cotton solids for the kitty.
Once I had created my kitty block, I wasn’t sure if I wanted to keep it as-is or go ahead and add the three stars surrounding the kitty. I’m pretty sure that I’m going to turn this block into a mini quilt so I thought that the three stars would just up the cuteness factor.
Here’s a look at my finished block:
Swoon! This block is so adorable. The kitty looks like she’s coming in for a hug with her favorite human. I love it so much!
I’m still leaning towards keeping this space kitty as a mini quilt to hang in my sewing room. If I decided to make the small size quilt, I’d need three more space kitty blocks.